Serves: 5
Don’t you just love the aroma of fresh-baked bread? It’s a smell that says "home." And it’s one that you can easily bring to your home, even if you’re new to baking. Making yeast breads isn’t hard they just take time for rising, and the results are well worth the wait. From Focaccia, to Caramel Sticky Rolls, in this chapter you’ll find(and learn to make)breads that rise to any occasion.
Pans and Pan Preparation
For well-browned crusts, use uninsulated pans and cookie sheets. Cookie sheets without a rim or sides also will allow better heat circulation and the bread will brown better. If you’re using pans with dark nonstick coating, watch carefully so bread doesn’t get too brown. Check the manufacturer’s directions for oven temperature sometimes reducing it by 25° is recommended.
For tender, golden brown crusts on rolls and sweet rolls, use shiny cookie sheets and muffin cups, which reflect heat.
Ingredients
What does it take to make bread? Basically, just a few simple ingredients. Of course, for the best bread, start with fresh, high-quality ingredients.
All-purpose Flour: All-purpose flour is the most widely used flour. The amount of protein in flour varies with the wheat crop the moisture content can vary, too. That’s why most recipes for kneaded dough give a range of amount of flour. Also see Flour.
Bread Flour: Bread flour is made from a special blend of wheats higher in protein than the wheat used in all-purpose flour. Protein produces gluten, which gives structure and volume to yeast breads. Bread flour is ideal to use in bread machines as well as for all yeast breads. Also see Flour.
Yeast: Yeast is a living organism that converts its food to alcohol and carbon dioxide. It’s the carbon dioxide bubbles that make dough rise. Yeast is very sensitive-too much heat will kill it, and cold will stunt its growth. Always check the expiration date on the yeast package before using.
Most of the recipes in this chapter follow the "quick-mix" method: mixing the yeast with part of the flour, then beating in very warm liquid (120° to 130°). Some recipes, however, still use the traditional method of dissolving the yeast in warm water (105° to 115°).
If you’re using quick active dry yeast, rising times may be shorter. Check the manufacturer’s directions for the best results.
For best results, be sure to use the temperatures for liquids given in each recipe. Also see Yeast.
Liquids: Water and milk are the most commonly used liquids. Water gives bread a crisper crust milk provides a velvety texture and added nutrients.
Sweeteners: Sugar, honey and molasses provide “food” for the yeast to help it grow, enhance the flavor of the bread and help brown the crust. Don’t use artificial sweeteners because they don’t properly “feed” the yeast.
Salt: Salt is a flavoring needed to control the growth of the yeast and prevent the dough from rising too much, which can cause the bread to collapse. If you reduce the salt in a recipe, you’ll need to decrease both rising times, too.
Fat: Butter, margarine, shortening and vegetable oil make bread tender. In addition to tenderness, butter and margarine add flavor.
Eggs: Eggs are sometimes added for flavor, richness and color.
Baking Yeast Breads
Just before baking, give your bread one of these professional finishing touches:
For a shiny crust, brush the top of the bread with an egg or egg white beaten with a little water. If desired, sprinkle with poppy, caraway or sesame seed or rolled oats.
For a softer, deep golden brown crust, brush with softened butter or margarine.
For a crisp crust, brush or spray lightly with water.
For a soft, tender crust, brush with milk.
After glazing (brushing with one of these ingredients), slash the top of the loaf with a sharp ser-rated knife, cutting about 1/4 inch deep, once down the center of the loaf or across the loaf a few times.
Here are some tips for successful bread:
Always preheat the oven.
On a lower oven rack, stagger the loaf pans so they don’t touch the sides of the oven or each other. The top of each pan should be level with, or slightly above, the middle of the oven.
If baking round loaves on a cookie sheet, place the sheet on a rack in the center of the oven.
To tell if bread is done, tap the crust. If the loaf sounds hollow, it’s done.
Remove loaves from the pans immediately so the sides remain crusty, and place them on wire racks away from drafts to cool.
Cutting Bread
Place loaf on a cutting board or other surface suitable for cutting. Slice with a serrated bread knife or an
electric knife.
If bread is very fresh or still warm, turn it on its side to avoid squashing the top.
Go beyond slices: cut round loaves into wedges, or cut slices into fingers or fun shapes with cookie cutters. Homemade Croutons or Bread Pudding with Whiskey Sauce from the leftover pieces.
Storing Bread
Store breads and rolls in airtight containers in a cool, dry place for up to five days. Breads get stale faster if you store them in the refrigerator, so refrigerate them only if they contain meat, cheese or other perishable ingredients or if the weather is hot and humid.
To freeze bread, wrap it tightly in moistureproof and vaporproof wrap and freeze for up to three months. To thaw, let stand, wrapped, at room temperature for 2 to 3 hours. Or microwave it on Defrost (30% power) for 6 to 8 minutes.
To warm thawed baked bread or rolls, wrap in aluminum foil and reheat in the oven at 350° for 15 to 30 minutes. For a crisp crust, unwrap bread for the last 5 minutes of heating.
Types of Yeast Doughs
There are two kinds of yeast doughs: batter and kneaded. Batter breads are shortcut, no-knead yeast breads. Kneaded breads require more time-as well as energy-for kneading. Both kinds need to rise before baking to let the yeast activate.
Batter dough: Because it contains less flour than kneaded dough, batter dough is stickier and is not shaped. Batter bread has a coarser texture than bread that’s kneaded and has a pebbled surface.
Kneaded dough: Kneading develops gluten from the protein in flour and produces an even texture and a smooth, rounded top. If dough isn’t kneaded enough, the bread will turn out coarse, heavy, crumbly and dry. To knead, follow the directions in How to Make Yeast Dough.
You also can use a standard countertop electric mixer with a dough-hook attachment. It mixes dough enough for satisfactory loaves of bread, although they may have slightly less volume than those kneaded by hand. A heavy-duty mixer produces loaves with higher volumes follow the manufacturer’s instructions for the size of recipe the mixer can handle, as well as mixing times. And some recipes prepare dough in a food processor. Check the manufacturer’s directions.
For rising kneaded doughs, put the dough in a large bowl greased with shortening, turning the dough to grease all sides. Cover loosely with plastic wrap and set in a warm, draft-free place. Or place the covered bowl on a wire rack over a bowl of warm water. You also can let dough rise in the microwave: Fill a measuring cup with water and microwave until the water boils. Set the bowl of dough in the microwave with the steaming water.
Shaping Dough
There’s more than one way to shape the perfect loaf of bread.
Use it for shaping Traditional White Bread, Cinnamon Swirl Bread, and Honey-Whole Wheat Bread.
Here is a second method for shaping, although we don’t recommend it for Cinnamon Swirl Bread because when it’s cut, the bread won’t have an even, spiral appearance.
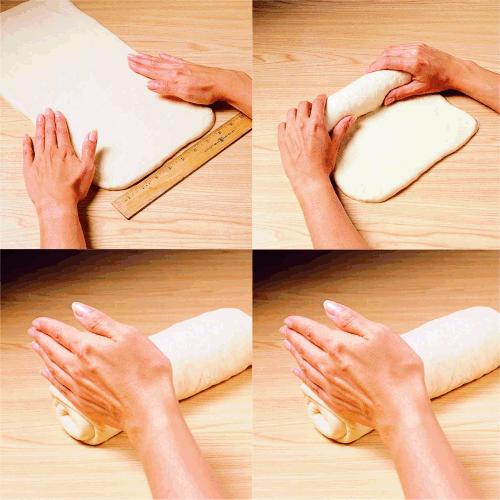
1. With your hands or a rolling pin, flatten each half of the dough into a 18 X 9-inch rectangle.
2. Fold the rectangle crosswise into thirds, overlapping the two sides. Flatten or roll the dough into a 9-inch square.
3. Roll up the dough square tightly, beginning at one of the open (unfolded) ends and pressing with your thumbs to seal after each turn, to form a loaf.
4. Firmly pinch the edge of the dough into the roll to seal it.
5. Press each end of the roll with the side of your hand to seal fold the ends under the loaf.
Yeast Bread Cures
Great Traditional Yeast Bread and Rolls Are:
High and evenly shaped
Uniformly golden or dark brown
Even in texture with no large air holes
Problem Possible Cause
Not high - water too hot for yeast
- too little flour
- not kneaded enough
- rising time too short
- pan too large
Coarse texture - rising time too long
- too little flour
- not kneaded enough
- oven too cool
Dry and crumbly - too much flour
- not kneaded enough
Large air pockets - dough not rolled tightly when loaf was shaped
Yeasty flavor - rising time too long
- temperature too high during rising time
From "Betty Crocker's Complete Cookbook, Everything You Need to Know to Cook Today, 9th Edition." Text Copyright 2000 General Mills, Inc. Used with permission of the publisher, Wiley Publishing, Inc. All Rights Reserved.
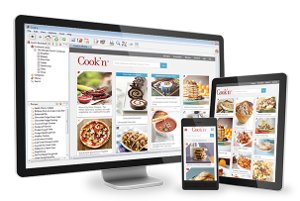
This YEAST BREAD BASICS recipe is from the Betty Crocker's Cookbook, 9th Edition Cookbook. Download this Cookbook today.
"I must say this is the best recipe software I have ever owned."
-Rob
"Your DVO cookbook software saves me time and money!"
-Mary Ann
"Call it nutrition software, meal planning software, cooking software, recipe manager, or whatever you want. It is the software I use to stay healthy!"
-David
"Your software is the best recipe organizer and menu planner out there!"
-Toni
"Thank you so very much for creating such a wonderful cooking recipe program. I think this is the best recipe program there is!"
-Sarah
"I saw lots of recipe software for PC computers but I was having a hard time finding really good mac recipe software. I'm so glad I discovered Cook'n! It's so nice to have all my recipes in a computer recipe organizer. Cook'n has saved me so much time with meal planning and the recipe nutrition calculator is amazing!!!
-Jill
My favorite is the Cook'n Recipe App.
-Tom