Serves: 5
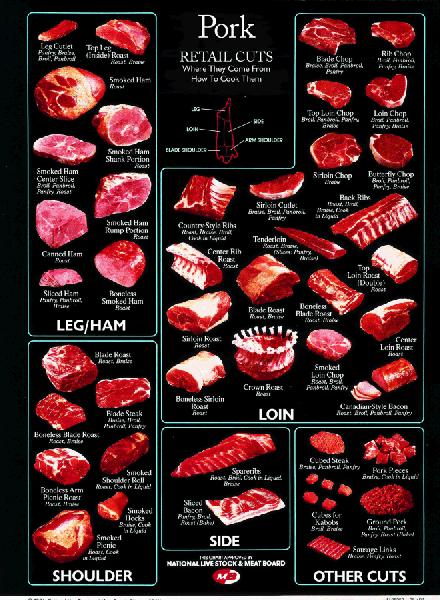
Selecting Pork
Lean and flavorful, fresh pork should be fine-grained and pale pink with white fat. Pork is available in a variety of cuts, from roasts to chops to tenderloins. When buying pork, keep in mind that an average serving is 3 ounces of cooked pork 4 ounces of uncooked boneless pork will give you 3 ounces cooked. You can cook pork lots of different ways: stew it, grill it, sauté it, roast it. The secret to cooking tender, juicy pork is to think pink. When cooked to an internal temp of 160°, pork has just a hint of pink. Modern feeding practices have made the age-old fear of trichinosis unfounded today. Trichinae are very rare. Even in the highly unlikely event they were present, trichinae are killed at 137°--well below the recommended 160°. Because pork has little fat, overcooking pork (over 160°) will make it tough and dry.
Ham, cured meat from the hind legs of hogs, should be firm, plump, fine-grained, rosy pink and without excess moisture. Any fat should be firm and white. You may notice a rainbowlike appearance on the surface of ham-don’t worry, it’s perfectly safe. It’s called iridescence and is caused by the refraction of light on the cut ends of the muscle fibers.
Curing gives ham its salty flavor exposure to wood smoke or smoke-flavored liquids gives ham its smoky flavor. Smoking and curing also can darken the color of the meat. Ham is available bone-in, semi-boneless, boneless, canned and country style. Bone-in hams may be sold as whole hams, shank and rump halves, shank and rump (butt) portions and center slices. Plan on four servings per pound of fully cooked boneless ham, two servings per pound of bone-in.
The most popular ham is fully cooked, brine cured and spiral cut. Fully cooked hams are ready to eat to warm, heat to 140°. Hams labeled "cook before eating" must be cooked to an internal temperature of 160°. If you aren’t sure what kind of ham you’ve bought, cook it to 160° to be safe.
Country or country-style hams have been dry cured and smoked and are often quite salty, the opposite of wet-cured hams, or "city hams" as some people call the ham most of us are familiar with. Look for them bone-in, boneless or sliced. To get rid of the excess salt before serving these hams, if you like, soak them in cold water for 24 to 72 hours. Refrigerate the ham immediately after soaking if you won’t be serving it cold right away or if you’re not ready to serve it hot. To serve it hot, heat to an internal temperature of 140°.
Turkey ham is skinless, boneless turkey thigh meat that has been cured and smoked to taste like ham. Turkey ham may be lower in calories and fat than regular ham, but check the label. Turkey hams are available in large, boneless pieces or as cold cuts. The large pieces, like fully cooked hams, can be eaten cold or warm by heating to an internal temperature of 140°.
Roasting Pork
Pork is roasted in the oven with no water, so start with a tender cut such as a top loin. Check the Timetable for Roasting Pork to determine the right oven temperatures and times for each cut. Follow these steps for roasted pork that’s well browned on the outside and moist and tender inside:
1. Choose one of the cuts from the Timetable for Roasting Pork.
2. Place the pork--right from the refrigerator--fat side up (if present), on a rack in a shallow roasting pan. (For easy cleanup, line the pan with aluminum foil first.) As the fat melts, it bastes the pork, making basting during cooking unnecessary.
3. If you like, season the pork with herbs, spices or other seasonings before, during or after cooking. Sprinkling the roast with salt before cooking adds flavor.
4. Insert a meat thermometer so the tip is centered in the thickest part of the roast and not resting in fat or touching bone. Don’t cover the roast or add water.
5. Roast at 350°. Roast ribs until tender for all other cuts, use the chart as a guide and roast for the recommended time until the meat thermometer reads the "Meat Thermometer Reading (after roasting)" temperature. The roast will continue to cook after you take it out of the oven.
6. Take the roast out of the oven and cover it loosely with a foil tent. Let stand for 15 to 20 minutes or until it reaches the "Final Meat Thermometer Reading (after standing)" temp. After standing, the roast also will be easier to carve. Avoid covering the roast tightly because doing so will create steam, which will soften the surface of the pork.
Broiling or Grilling Pork
Broiling and grilling are great ways for cooking roasts, ribs, tenderloin, chops and patties. Less-tender cuts, such as ribs and roasts, grill best if they’re marinated first and cooked over indirect heat. The tips below use direct heat. For more information on using your grill, check out the instruction booklet that came with your grill. Check the Timetable for Broiling or Grilling Pork to determine the cook time and doneness temperature for each cut.
1. Choose a cut of pork from the Timetable for Broiling or Grilling Pork. If you like, marinate the pork first.
2. To Broil: Set oven to broil. Check your oven manual for whether the oven door should be open or closed during broiling.
To Grill: Heat the coals or gas grill to medium spread the coals to a single layer.
3. To Broil: Place pork on the rack in the broiler pan. (For easy cleanup, line the pan with aluminum foil first.) Position the pan so the top of the pork is the distance from the heat recommended in the chart.
To Grill: Place pork on the grill the distance from the heat recommended in the chart.
4. Broil or grill the pork for about half the recommended time or until it’s brown on one side.
5. Turn the pork, and continue broiling or grilling until the doneness shown in the chart on page 249 for the cut you’re using. To see if it’s done, cut a small slit in the center of boneless cuts or in the center near the bone of bone-in cuts. Medium pork is slightly pink in the center, well-done pork is creamy-tan all the way through. If you like, season the pork after it’s done.
Panbroiling Pork
Panbroiling is a quick, fat-conscious way to cook pork because drippings are poured off as they form. In other words, the meat doesn’t stew in its own juices. Panbroiling is a great way to cook pork chops and patties. Check the Timetable for Panbroiling Pork, below, to determine the right oven temperatures and times for each cut.
1. Choose one of the cuts for panbroiling from the Timetable for Panbroiling Pork.
2. Use a heavy nonstick skillet, or coat a regular skillet with a film of vegetable oil or cooking spray. Heat the skillet for 5 minutes over medium heat.
3. Put the pork in the skillet don’t cover and don’t add oil or water.
4. Cook for the time recommended in the chart, turning occasionally, until the pork is brown on both sides and reaches the doneness shown in the chart for the cut you’re using. Drain excess drippings from the skillet as they form. To see if the pork is done, cut a small slit in the center of boneless cuts or in the center near the bone of bone-in cuts. Medium pork is slightly pink in the center well-done pork is creamy-tan all the way through. If you like, season the pork after it’s done.
Roasting Ham
Ham is roasted in the oven with no water. Check the Timetable for Roasting Ham, below, to determine the right oven temperatures and times for the type of ham you’ve chosen. (See also Glazed Baked Ham.) Follow these steps for roasted ham that’s well-browned on the outside and moist inside:
1. Choose one of the types of ham from the Timetable for Roasting Ham.
2. Place ham--right from the refrigerator--fat side up (if present), on a rack in a shallow roasting pan. There is no need to season ham with salt, pepper, herbs or spices. (For easy cleanup, line the pan with aluminum foil first.) As the fat melts, it bastes the ham, making other basting unnecessary.
3. Insert a meat thermometer so the tip is centered in the thickest part of the ham and not resting in fat or touching bone. Don’t cover the roast or add water.
4. Roast at 325° preheat the oven for hams weighing less than 2 pounds. Roast as directed in the chart until the thermometer reads 135°. The ham will continue to cook after you take it out of the oven.
5. Take the ham out of the oven and cover it loosely with a foil tent. Let stand for 15 to 20 minutes or until it reaches 140°. After standing, the ham also will be easier to carve.
Broiling, Panbroiling and Panfrying Ham
Broiling
1. Choose one of the types of ham from the Timetable for Broiling, Panbroiling and Panfrying Ham, below.
2. Set oven to broil. Check your oven manual for whether the oven door should be open or closed during broiling.
3. Place ham on the rack in the broiler pan. (For easy cleanup, line the pan with aluminum foil first.) Position the pan so the top of the ham is four to five inches from the heat.
4. Broil for the time shown in the chart, turning once.
Panbroiling
1. Choose one of the types of ham from the Timetable for Broiling, Panbroiling and Panfrying Ham, below.
2. Use a heavy nonstick skillet, or coat a regular skillet with a film of vegetable oil or cooking spray. Heat the skillet for 5 minutes over medium heat.
3. Put the ham in the skillet don’t cover and don’t add oil or water.
4. Cook for the time recommended in the chart, turning occasionally, until the ham is hot. Drain excess drippings from the skillet as they form.
Panfrying
1. Choose one of the types of ham from the Timetable for Broiling, Panbroiling and Panfrying Ham, below.
2. Heat a small amount of vegetable oil in a heavy skillet over medium heat.
3. Cook the ham, uncovered, in the oil, turning occasionally, until it’s hot.
From "Betty Crocker's Complete Cookbook, Everything You Need to Know to Cook Today, 9th Edition." Text Copyright 2000 General Mills, Inc. Used with permission of the publisher, Wiley Publishing, Inc. All Rights Reserved.
This PORK BASICS recipe is from the Betty Crocker's Cookbook, 9th Edition Cookbook. Download this Cookbook today.
"I must say this is the best recipe software I have ever owned."
-Rob
"Your DVO cookbook software saves me time and money!"
-Mary Ann
"Call it nutrition software, meal planning software, cooking software, recipe manager, or whatever you want. It is the software I use to stay healthy!"
-David
"Your software is the best recipe organizer and menu planner out there!"
-Toni
"Thank you so very much for creating such a wonderful cooking recipe program. I think this is the best recipe program there is!"
-Sarah
"I saw lots of recipe software for PC computers but I was having a hard time finding really good mac recipe software. I'm so glad I discovered Cook'n! It's so nice to have all my recipes in a computer recipe organizer. Cook'n has saved me so much time with meal planning and the recipe nutrition calculator is amazing!!!
-Jill
My favorite is the Cook'n Recipe App.
-Tom