
Master Baker Tells How to Make a Pie as Easy as a Peanut Butter Sandwich!
By Alice Osborne
We have a friend, Dennis Weaver, who is a master baker and owns a marvelous kitchen and baking store in Idaho, the Prepared Pantry. And when I say "we" have a friend, I mean YOU as well as me! Dennis is all about helping people become better cooks and bakers and enjoying the process more. He's a prolific writer on the topic and shares his books on his site (PreparedPantry.com) as FREE downloads. His 250 page book, How to Be a Better Baker is just wonderful, for instance.
 In his latest newsletter, he shares encouragement and know-how for making pies as good as the bake shop - even fancy pies. He starts us off with information on how to bake the perfect crust, and that's good, because as he says, it's the crusts that intimidate people:
The standard approach is to cut the butter or shortening into the flour with a pastry knife, keeping the dough cold, working quickly, and not handling the dough too much. Dennis says to forget that and use a pie crust mix instead, because it's "darned near foolproof." Just add water, beat it with the paddle in your stand-type mixer for no more than a minute and you're done. This idea sounds pretty good to me.
 Next Dennis shows how to make pie crust look pretty, in 3 easy steps:
• Sprinkle a little flour on the counter and roll out the dough until it is a little thinner than 1/4 inch thick. (Sprinkle a little flour on the rolling pin, if needed.)
• Transfer the dough to the pie pan. Trim the edges using a sharp knife or a bench scraper.
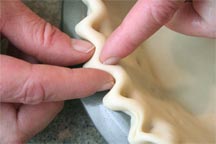
• Create a pretty edge by pinching in even intervals around the crust (see picture).
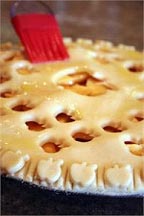
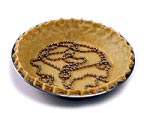 If you need a pre-baked crust, fill the crust with ceramic pie weights or a pie chain weight and bake. If not, load it with a filling. Sometimes, you'll need a top crust. Add it, trim it, and flute it in the same way. (Make sure you press the bottom and top dough sheets together with a fork before forming the edge so it doesn't leak.) Cut vent holes and bake. Even easier, forget the top crust and cover the filling with your favorite streusel recipe instead.
Now comes the baking. There are two problems with baked pie crusts: The top edges can burn and the bottom can be soggy and/or under-baked. You can solve both those problems with smart equipment.
• 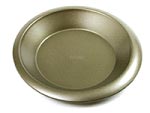 Use dark pie pans. Dark pie pans absorb and distribute the heat. Your bottom crust will be browned and crisp. (These are pretty amazing pans. You can slide your pie out of the pan and onto a plate for cutting and serving.)
•  Cover the top edge of the pie with a pie shield. Those top edges take a beating in the oven. By the time the bottom crust is baked, the top is burned. A pie shield stops that. Use one every time you put a pie in the oven,
You're ready to go! Grab some recipes and start making some easy pies. Once you've made a couple pies, they'll be as easy as peanut butter sandwiches - almost. You'll be the designated pie baker at family reunions, church socials, and with friends. No more expensive trips to the bakery!
Fresh Peach (or Strawberry) White Chocolate French Silk Pie
If you have fresh peaches, consider this incredibly good French silk pie. If it is not peach season, consider making this pie with strawberries or mangos.A French silk pie is usually made with dark chocolate; this one uses white chocolate. They are usually made with raw eggs. In this recipe, they are cooked.
 1 nine-inch deep dish pie shell, baked and cooled
3 large eggs
2/3 cup granulated sugar
1 quarter-ounce packet non-flavored gelatin
1 tablespoons water
10 ounces white chocolate wafers or other quality coating or eating chocolate
1/2 cup butter cut into pieces and softened
1 cup whipping cream
1 teaspoon vanilla
1 cup whipping cream
1/2 teaspoon vanilla
1/3 cup granulated sugar
2 cups fresh peaches peeled and diced
peaches for garnish and topping
Mix sugar and gelatin powder together. Add eggs, sugar mixture, and water to a large sauce pan. Cook egg and sugar mixture over low to medium low heat while beating constantly with an electric mixture. Continue cooking and beating until mixture starts to thicken and reaches 165 degrees (be careful not to scorch the eggs). Remove from heat.
Immediately mix butter into the hot egg mixture with electric mixer until smooth. As soon as butter is melted, and while the mixture is still hot, add the white chocolate wafers. Continue beating until it is completely mixed together and cooled to room temperature.
Whip the first measure of whipping cream in your stand-type mixer with the whip attachment until stiff peaks form. Add the vanilla flavor. Add the peaches.
Change from the whip attachment to the paddle attachment. Scrape the white chocolate mixture into the bowl with the whipped cream. Turn the mixer onto the slow speed setting and gently fold the chocolate mixture into the whipped cream. Mix for less than a minute, until the white chocolate is mixed into the whipped cream. Scrape the filling into the prepared pie pan. Set aside and let chill.
When you are about ready to serve, whip the second measure of whipping cream. As the cream is whipping and after the peaks start to form, drizzle in the sugar and add the flavor. Beat until stiff peaks form. Top your pie with peaches and whipped cream.

