The Cook'n Snip-It Tool: Saving Time and Sanity!
One of the great features of Cook’n 11 is that you can add recipes simply by clicking a few buttons. No need to fear if you are a slow typist or don’t have the time or energy to slowly enter every part of a recipe into Cook’n. You can save yourself a lot of time, energy, and sanity by using the handy-dandy Snip-It tool.
The Snip-it tool allows you to highlight parts of your recipe and transfer it to the correlating section of the recipe in Cook’n. For example, I can highlight the ingredients and have them go directly into the ingredients section of my recipe. This tool is particularly helpful when you want to input a recipe from a blog or other website where the recipe may not necessarily be in a recognizable recipe format.
When you want to snip a recipe into Cook’n, you can start a couple different ways. You can search for the recipe directly in Cook’n by clicking the search button (it looks like a magnifying glass) on the tool bar at the top, or you can use the search bar that comes up in the live feed when you first open your Cook’n program. If you don’t want to look for the recipe directly in Cook’n, you can just start by clicking on the Snip-It tool button on the toolbar (it’s the button that looks like a pair of scissors), and a box will come up that will allow you to type (or copy and paste) the direct url of the website from which you want to access the recipe.
That’s probably the hardest part of the whole process! Once you have found the specific recipe you want to input, you’re literally just a couple of clicks away to being completely done! When you click on the Snip-It tool, a new window will open. In one window, you will have your blank recipe, and the other window will have your recipe and a new tool bar that goes down the side of your recipe. You’ll see buttons that are each a different color and are labeled the different parts of a recipe (i.e. directions, photo, ingredients, etc). To finish inputting your recipe, highlight one section of the recipe (e.g. name, description), and then click on the corresponding button.
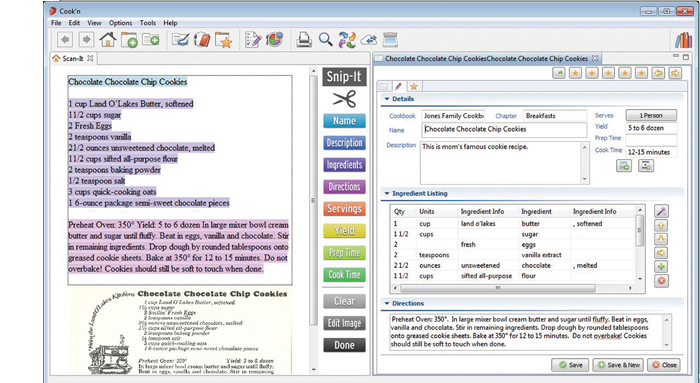
The text (or photo) that you highlighted will automatically be highlighted in the same color of the corresponding button, and the text will appear in the correct spot in your blank recipe (although at this point it shouldn’t be blank anymore!). You just continue this process of highlighting and clicking the matching button until your entire recipe is highlighted and transferred into your new recipe.
Once that is done, I always look over the recipe to make sure that everything transferred correctly. Sometimes, for example, an unrecognized ingredient will go into the ingredient info column instead of the specific ingredient column, so you may need to tweak a few things. Once everything looks good, click save and voila! You have inputted a new recipe with just a few clicks of a button and minimal typing!
I hope this helps as you start collecting recipes for your holiday cooking!
 Camille Hoffmann
Weekly Newsletter Contributor since 2014
Email the author! camille@dvo.com