Serves: 5
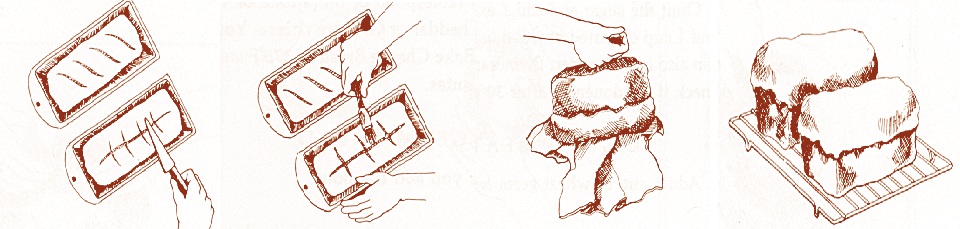
STEP 17. While the oven is heating up, use a sharp knife or singleedge razor blade to cut a few 1/2-inch-deep slits into the top of the dough to let the steam escape as it bakes. The slits will also spread apart during baking to make a decorative pattern. For long loaves, you can make three or four diagonal slits, or one long slit down the center. For round loaves, cut a cross or a few diagonal slits on top. A tic-tac-toe with two slits in each direction also makes an interesting top on round loaves.
STEP 18. For a crisp crust, brush the tops of the loaves with cold water (use a pastry brush, a spray bottle, or your fingers) just before popping them into the oven. If you want a very crisp crust, repeat this coldwater treatment once or twice more during the baking period. You can also place a pan of hot water on the bottom of the oven or toss in a few ice cubes to create steam, which makes for a good crust. If you prefer a soft crust, brush the tops of the loaves with butter or oil before baking. Brush on more as soon as they come out of the oven.
STEP 19. Place the pans in the oven on a fairly low shelf. The top of the baked bread should reach the center of the oven (roughly). If you are using more than one pan, do not let them touch each other or the sides of the oven. Use a timer or watch the clock as a guide for baking doneness, but keep in mind that this will give you only an approximate indication. For a true test of doneness, turn the bread out of the pan (or remove it from the baking sheet) and rap it on the bottom with your knuckle. It should make a hollow sound. If it doesn’t, put it back in the oven (in or out of the pan), bake it a few minutes more, and then try again. If the bottom of the bread isn’t brown enough, don’t put it back in the pan; place it directly on the oven rack to bake a little longer.
STEP 20. As soon as you remove the bread from the oven, turn it out of the pan and place it right side up or on its side on a wire rack to cool. If you leave hot bread on a solid surface, the bottom will get soggy from the steam that is created. If you do not have a rack, place the bread crosswise on a loaf pan or bowl so the air can circulate all around it. If you can wait that long, let the bread cool until you can handle it comfortably, then slice it with a serrated knife.
TIP
For a round or oval loaf, mold the dough into a ball by cupping your hands around it, while frequently slapping it down and turning. For a long bread, like a French baguette or an Italian-style loaf, use the same technique as for a loaf-pan bread, only make a much longer, narrower rectangle. To bake bread in a coffee can, clay pot, or other unorthodox container, just form the dough into roughly the same shape as the container and drop it in. And if you are going to bake your bread on a flat pan or baking sheet, you can form it into any shape you want. You can vary these basic shapes to create loaves with different, more interesting looks. For instance, when you make a round bread, save a small piece of dough, form it into a ball, and set it on top—right in the center—of the larger round. This adds a decorative touch to the basic round loaf. When making a long bread, turn it into a spiral by giving the dough a twist. Make braided breads by dividing the dough into three strands, rolling them with your hands into ropes, and then braiding them together. You can also make patterned breads by baking them in special molds, such as bundt pans. Be creative and enjoy the experience.
TIP Although the heat of the oven will kill the yeast and stop the rising process, there will be some delay before it penetrates to the center of the loaf. This means you can expect some further rising during the first few minutes of baking.
This Baking the Loaves recipe is from the Great Natural Breads Made Easy Cookbook. Download this Cookbook today.
"I must say this is the best recipe software I have ever owned."
-Rob
"Your DVO cookbook software saves me time and money!"
-Mary Ann
"Call it nutrition software, meal planning software, cooking software, recipe manager, or whatever you want. It is the software I use to stay healthy!"
-David
"Your software is the best recipe organizer and menu planner out there!"
-Toni
"Thank you so very much for creating such a wonderful cooking recipe program. I think this is the best recipe program there is!"
-Sarah
"I saw lots of recipe software for PC computers but I was having a hard time finding really good mac recipe software. I'm so glad I discovered Cook'n! It's so nice to have all my recipes in a computer recipe organizer. Cook'n has saved me so much time with meal planning and the recipe nutrition calculator is amazing!!!
-Jill
My favorite is the Cook'n Recipe App.
-Tom