The Easiest (and Tastiest!) Spring/Easter Cake!!
Spring is here!! Well, sort of… we’re still battling snow but at least there’s more sun shining than there was in December!
There are so many cute, craftsy projects and recipes online, and while they are totally up some people’s alleys- not everyone is Martha Stewart! Some of us need a little more help ;).
As I was looking for bunny cake ideas for my sister-in-law’s baby shower, I came across the simplest idea that is both cute and elegant- and something anyone can do! If you can bend wire, you can make a cute little bunny cake. Perfect for Easter, birthday parties, spring celebrations, or just for fun!
I went to Joann’s and bought some floral tape, a couple different mini plastic flower arrangements, and some wire covered in brown cloth. I bent two wires into bunny ear shapes, which is extremely easy to do. I wrapped the end in floral tape to help the ears keep their shape, and to keep any cloth fibers from getting into the cake.
I put together a couple different arrangements with the various flower pieces I bought, wrapped the bottoms with floral tape and bent them so that I could place them into the cake and have them lay flat.
This was the end result:
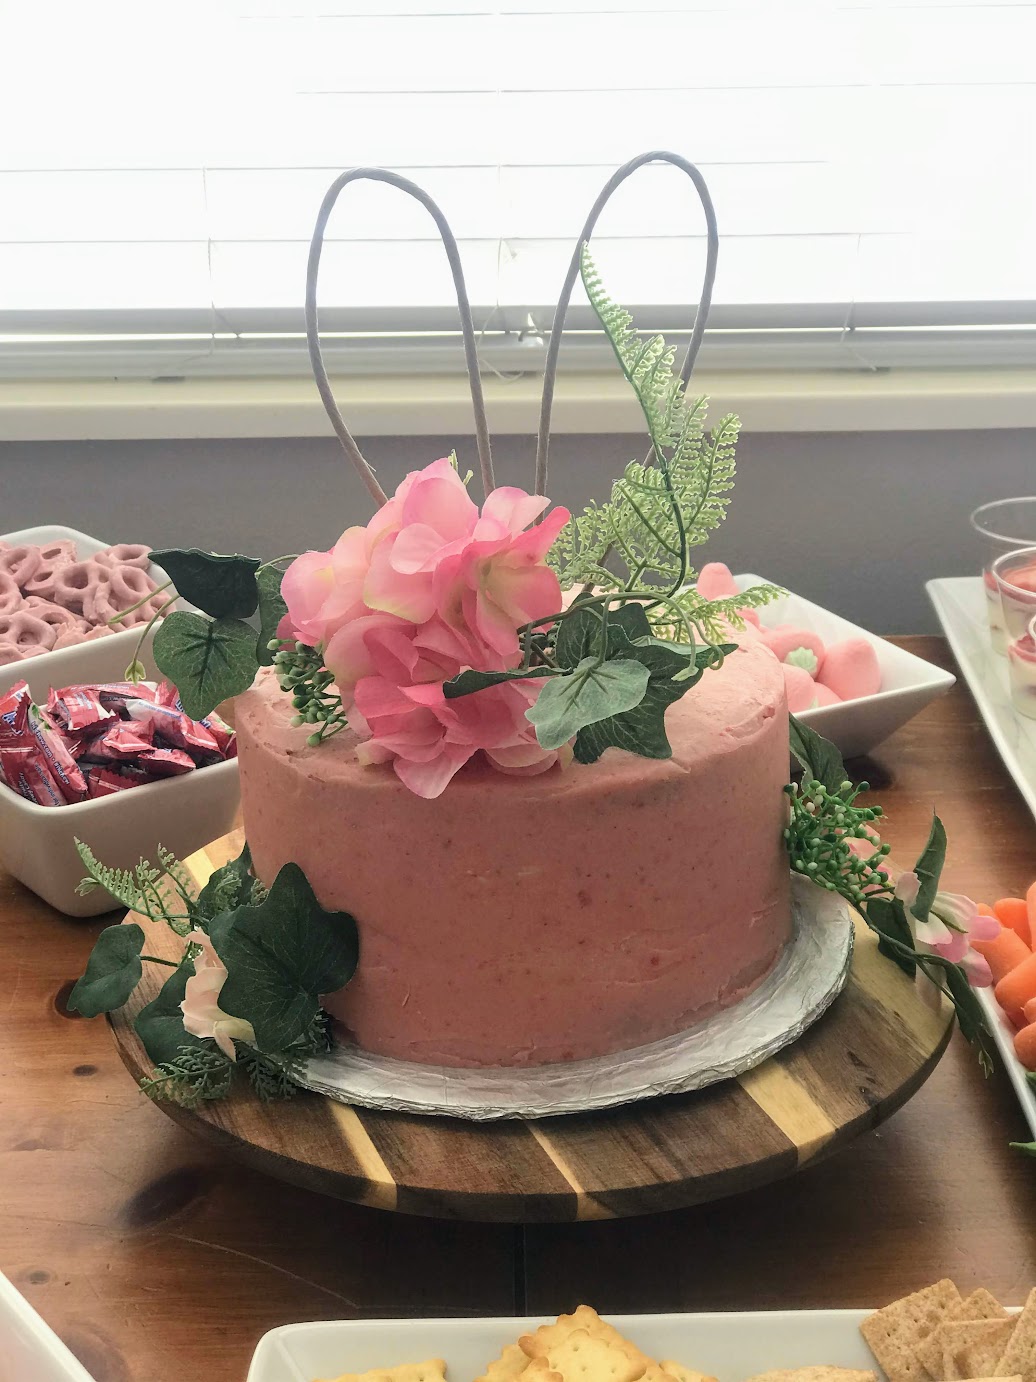
Not to toot my own horn, but I thought it was pretty cute! The perfect mix of elegant and cute. And quite obviously a bunny, without having to try to be any more crafty than that!
Again, such a simple idea that would be perfect for Easter cakes, one-year-old smash cakes, baby showers, spring celebrations, or anyone that wants to try their hand at a cake that looks super fancy but is quite simple to put together!
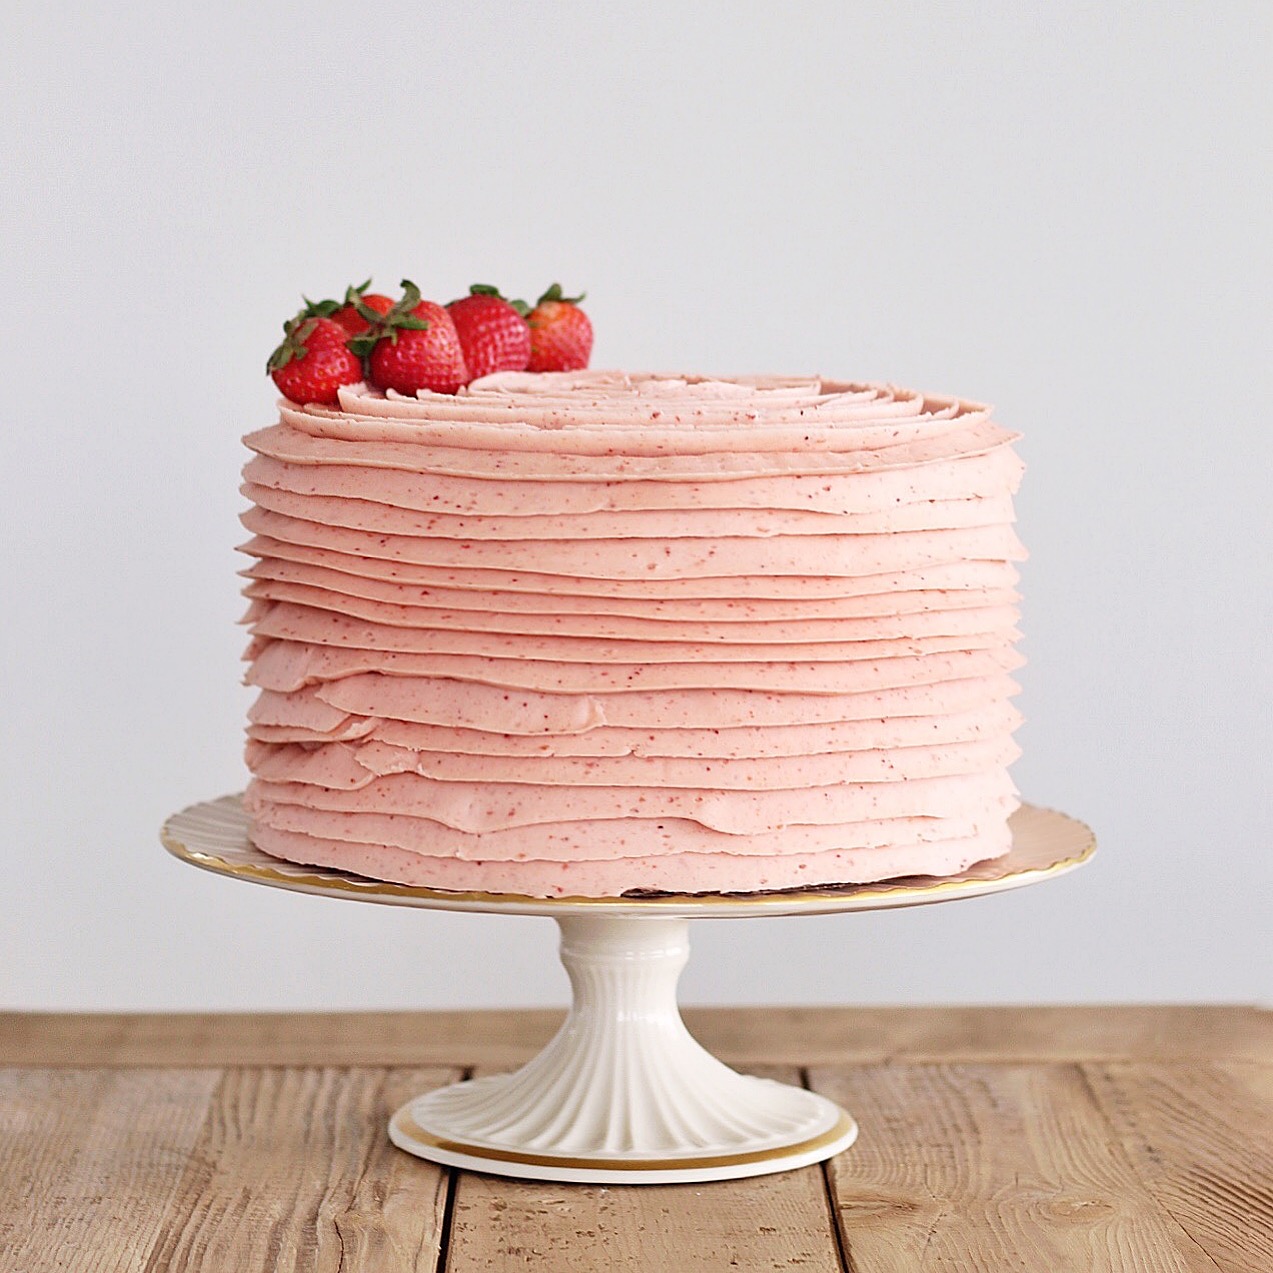
And if you need a fabulous recipe to go with it, you can’t go wrong with any of cakebycourtney.com’s recipes, but this strawberries n’ cream recipe was extremely divine! You don’t use any strawberry extract. It’s pure strawberry flavors, using a strawberry reduction from freshly chopped strawberries, freeze-dried strawberries, and strawberry jam. It’s a little time-consuming, but spectacular! And the perfect springtime cake!
1 1/2 cups granulated sugar (350 g)
1 cup butter (226 g), room temperature
1/3 cup canola oil (72.6 g) vegetable or canola
4 eggs
3 egg whites
1 teaspoon vanilla extract (4.2 g)
2 teaspoons baking powder (4 g)
2 1/2 cups cake flour (287.5 g)
2 ounces strawberries (freeze dried strawberries measured and then pulverized into a powder)
1/2 teaspoon salt (2.8 g)
1 cup strawberries (232 g) strawberry puree reduction about 3 cups chopped strawberries pureed and simmered over the stove to thicken and reduce to 1 cup
2 cups heavy cream ( 462 g), cold, divided
3 tablespoons water (44.3 g), cold
1 tablespoon unflavored gelatin (9.25 g)
1/2 cup powdered sugar (62.5 g)
1 teaspoon vanilla extract (4.2 g)
fresh strawberries
2 cups butter (452 g), slightly chilled
4 cups powdered sugar (500 g), measured and then sifted
1/4 cup strawberries (40 g) freeze dried strawberries pulverized and then measured
1/3 cup whipping cream (76 g) heavy whipping cream
2 tablespoons strawberry jam
1 teaspoon vanilla extract (4.2 g)
*This buttercream recipe makes enough to fill and cover your cake. If you want to add additional piping you’ll want to make an extra 1/2 batch.
Directions:
Add Recipe to Cook'n
I’d love to see if you try your hand at a bunny cake! And even if you don’t decorate it, the strawberry cake is definitely worth making!
blog comments powered by Disqus
There are so many cute, craftsy projects and recipes online, and while they are totally up some people’s alleys- not everyone is Martha Stewart! Some of us need a little more help ;).
As I was looking for bunny cake ideas for my sister-in-law’s baby shower, I came across the simplest idea that is both cute and elegant- and something anyone can do! If you can bend wire, you can make a cute little bunny cake. Perfect for Easter, birthday parties, spring celebrations, or just for fun!
I went to Joann’s and bought some floral tape, a couple different mini plastic flower arrangements, and some wire covered in brown cloth. I bent two wires into bunny ear shapes, which is extremely easy to do. I wrapped the end in floral tape to help the ears keep their shape, and to keep any cloth fibers from getting into the cake.
I put together a couple different arrangements with the various flower pieces I bought, wrapped the bottoms with floral tape and bent them so that I could place them into the cake and have them lay flat.
This was the end result:
Not to toot my own horn, but I thought it was pretty cute! The perfect mix of elegant and cute. And quite obviously a bunny, without having to try to be any more crafty than that!
Again, such a simple idea that would be perfect for Easter cakes, one-year-old smash cakes, baby showers, spring celebrations, or anyone that wants to try their hand at a cake that looks super fancy but is quite simple to put together!
And if you need a fabulous recipe to go with it, you can’t go wrong with any of cakebycourtney.com’s recipes, but this strawberries n’ cream recipe was extremely divine! You don’t use any strawberry extract. It’s pure strawberry flavors, using a strawberry reduction from freshly chopped strawberries, freeze-dried strawberries, and strawberry jam. It’s a little time-consuming, but spectacular! And the perfect springtime cake!
Strawberries and Cream Cake
Strawberry cake layers with a fresh whipped cream filling, fresh strawberries and strawberry buttercream. Total Time: 2 30 hrsmins
Prep time:
Cook time:
Ingredients:
Cook time:
1 1/2 cups granulated sugar (350 g)
1 cup butter (226 g), room temperature
1/3 cup canola oil (72.6 g) vegetable or canola
4 eggs
3 egg whites
1 teaspoon vanilla extract (4.2 g)
2 teaspoons baking powder (4 g)
2 1/2 cups cake flour (287.5 g)
2 ounces strawberries (freeze dried strawberries measured and then pulverized into a powder)
1/2 teaspoon salt (2.8 g)
1 cup strawberries (232 g) strawberry puree reduction about 3 cups chopped strawberries pureed and simmered over the stove to thicken and reduce to 1 cup
2 cups heavy cream ( 462 g), cold, divided
3 tablespoons water (44.3 g), cold
1 tablespoon unflavored gelatin (9.25 g)
1/2 cup powdered sugar (62.5 g)
1 teaspoon vanilla extract (4.2 g)
fresh strawberries
2 cups butter (452 g), slightly chilled
4 cups powdered sugar (500 g), measured and then sifted
1/4 cup strawberries (40 g) freeze dried strawberries pulverized and then measured
1/3 cup whipping cream (76 g) heavy whipping cream
2 tablespoons strawberry jam
1 teaspoon vanilla extract (4.2 g)
*This buttercream recipe makes enough to fill and cover your cake. If you want to add additional piping you’ll want to make an extra 1/2 batch.
Directions:
FOR THE STRAWBERRY CAKE
Preheat your oven to 350 degrees F. Spray three 8-inch round cake pan with cooking spray. Line the bottoms with parchment. Spray again. Set aside.
In a medium sized mixing bowl, whisk together the flour, baking powder, salt and freeze dried strawberries. Set aside.
In a mixer fitted with the paddle attachment, beat the sugar and butter for about 2 minutes. Add the oil and beat for another 2 minutes, until light and fluffy.
Add the eggs and egg whites, one at a time, and mix well after each addition. Add the vanilla.
With the mixer on low, alternatively add the flour mixture with the strawberry puree, starting and finishing with the flour mixture. Mix until just incorporated.
Evenly divide the batter between the three pans, about 16 ounces in each.
Bake the cake layers for about 20-22 minutes, until a toothpick inserted in the center comes out with just a few moist crumbs on it.
FOR THE WHIPPED CREAM FILLING
In a small bowl, place the cold water and sprinkle with the gelatin. Let sit for at least 10 minutes. In a small saucepan, bring 1/3 cup heavy cream to a simmer and then stir in the gelatin mixture. Refrigerate, stirring frequently, until cool but not set, about 5-7 minutes.
In a chilled stainless steel bowl with a chilled whisk attachment, beat the remaining whipping cream, icing sugar, and vanilla until it thickens and soft peaks begin to form, about 1 to 2 minutes. Very gradually add the gelatin mixture and continue beating until medium-firm peaks form.
Keep covered and chilled until ready to use.
FOR THE STRAWBERRY BUTTERCREAM
In the bowl of a stand mixer fitted with a paddle attachment, cream the butter for about 2 minutes. This will soften the butter without it having to be warm.
With the mixer on low speed, gradually add the sifted powdered sugar, one cup at a time, mixing a little in between each addition.
Add the freeze dried strawberries and strawberry jam.
With mixer on medium speed, add whipping cream, and vanilla.
Turn the mixer to medium-high speed and beat for an additional 5 to 7 minutes. The frosting will become lighter in color and texture.
ASSEMBLY
Spread a small dollop of frosting on your cake board. This will act like glue to hold your cake in place.
Place your first cake layer, top side up, on your cake board. Pipe a rim of strawberry buttercream around the edge of the cake.
Spread about 1/2 cup of the whipped cream filling over the cake. Placed diced strawberries on the whipped cream and pat into place with your hand. Spread another 1/2 cup of the whipped cream filling over the strawberries.
Place the next cake layer on top of the filling and repeat steps 2 and 3.
Set your final cake layer, top side down, on your second layer of filling. Apply a thin crumb coat over your entire cake. This does not need to look pretty or be even. This coat of frosting is simply to lock in the crumbs. Freeze your cake for about 10 to 15 minutes to set the crumb coat.
After the crumb coat is set, finish frosting your cake.
I used the Wilton #125 petal tip for my design. If you want to do this design on your cake, you'll need an additional 1/2 of the buttercream recipe.
Source: scakebycourtney.com
Recipe formatted with the Cook'n Recipe Software from DVO Enterprises.
I’d love to see if you try your hand at a bunny cake! And even if you don’t decorate it, the strawberry cake is definitely worth making!
 Camille Hoffmann
Monthly Newsletter Contributor since 2014
Email the author! camille@dvo.com
Sources:
- https://cakebycourtney.com/strawberries-and-cream-cake/