Pâte à Choux…Another Term for YUM!

Do you like éclairs?
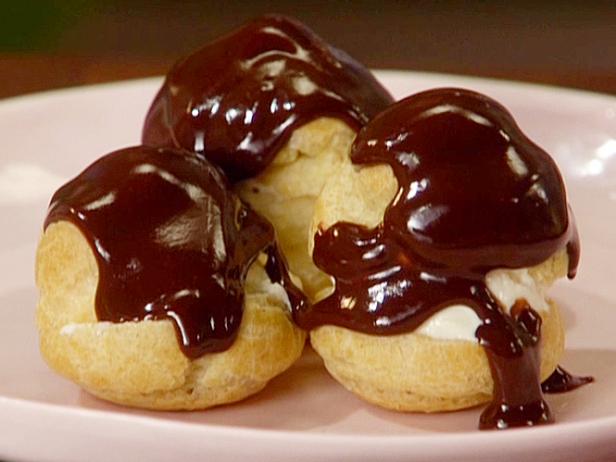
What about profiteroles?

And cream puffs?

Or cheesy gougères?
Aside from making us drool just thinking about them, the one thing all these pastries have in common is that they're made from pâte à choux — a staple of the French pastry kitchen.
According to one of my favorite chefs and food writers, Emma Christensen (she writes for www.thekitchn.com), Pâte à choux, or choux paste, is a paste made of flour, water, butter, and eggs — it's slightly thicker than a batter, but not quite as thick as a dough.

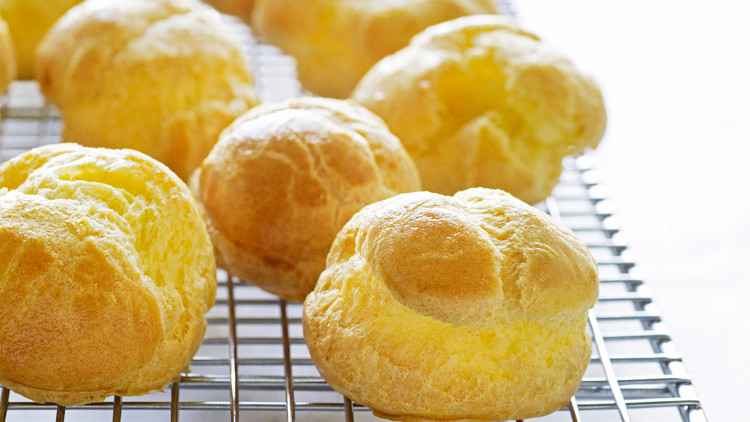
It's pronounced "pat a shoe," although neither patting or shoes has anything to do with it. "Pâte" means paste and "choux" means cabbage — the name comes from the resemblance to little cabbages when the puffs come out of the oven.
I first experienced this pastry in my grandmother’s kitchen. Grandma Jacobson was an incredible cook and baker. And because they had dairy cows on their farm, Grandma was always making things that used their fresh cream. Cream puffs were our very favorite. The way the whipped cream interacted with the sort of chewy texture was divine.
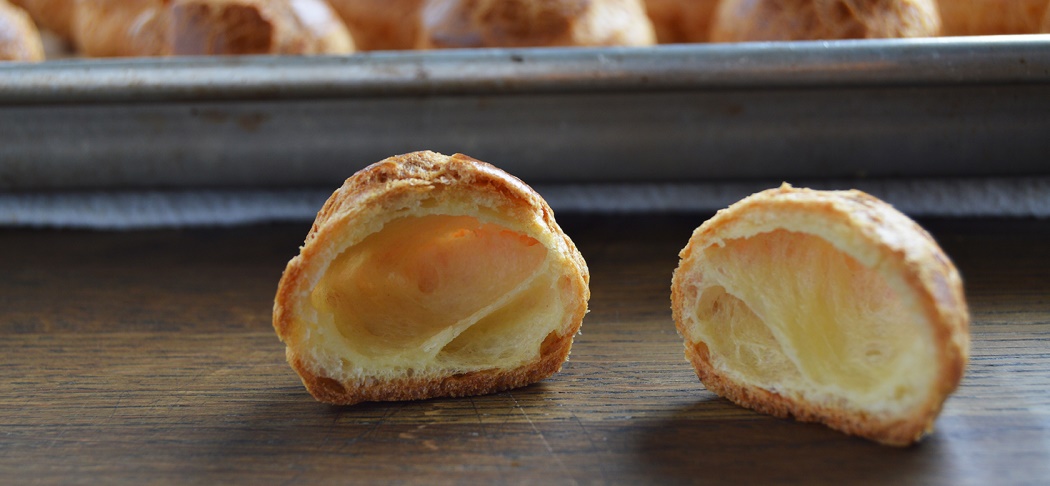
Anyway, the paste is thick enough that it can be scooped or piped into almost any shape you can think of, from the aforementioned puffs to éclair shells to thin straws. They contain no yeast or other leavening; instead, as the liquids in the paste evaporate in the oven, they puff up the pastry, creating a hard outer shell and a nearly hollow interior.
On its own without any embellishment, pâte à choux is pretty bland tasting; it's rarely served on its own. Either other ingredients are added to the dough to make it more flavorful (like the cheese for making gougères!), or the baked puffs get filled with pastry cream, ice cream, pie filling, mousse, or another tasty filling.

Making pâte à choux is a three-step process:
You add flour to hot water and milk;
then the dough is cooked on the stovetop for a few minutes to dry it out and cook the flour (which makes them taste better);
and finally, the eggs are beaten into the dough in a mixer.
Beating the eggs into the dough is the only potentially tricky step. Instead of adding all the eggs at once, it's important to only add as much egg as the dough will hold. If you add too many eggs, the dough will be too wet, you'll have trouble piping it, and the pastries will have trouble puffing and drying out in the oven. In other words, just because your recipe may call for 4 eggs doesn’t mean you’ll actually use all 4 eggs.
So first, whisk all the eggs together — this helps them incorporate more easily and evenly into the dough, and also makes it easier to add just half an egg if you need to. With the mixer running, add the eggs in three additions.
Stop before the last addition goes in and check the dough — if it's ready, it will hold its shape when scooped, and look soft, creamy-colored, and very smooth. If you scoop up a little bit with your spatula and let it slide back into the bowl, it should leave behind a little "V" of dough on the spatula. Add the fourth egg, or just half of the fourth egg, if needed.
Some days, you'll use only three of the four eggs. Other days, all four of them. It all depends on the humidity in your house and the kind of flour you're using that day.
Baking the pâte à choux is also a three-step process:
Start with the oven at high heat to help the pastries puff,
then lower it slightly to help them cook and to give them some golden color,
and finally lower the oven a third time to dry the pastries out.
Once baked, poke the pastries with a toothpick to make triple-sure no steam is trapped inside, then let them cool completely before filling.
With this basic tutorial, Emma has you ready to try her no-fail recipe. Pâte à choux is such a delicious and unique dessert that I think we’ll be serving them at our July 4th gathering. Lemon curd, sweetened whipped cream, and chocolate mousse. Yum, right?
PERFECT Pâte à Choux
8 tablespoons (4 ounces) unsalted butter
1 cup water
3/4 teaspoon salt
1 cup all-purpose flour
4 large eggs
1 large egg yolk, mixed with a tablespoon of water, for the egg wash
Pearl sugar, to top, if desired
EQUIPMENT NEEDED:
2- to 4-quart saucepan
Long-handled spoon
Stand mixer
Mixing bowl
Baking sheets
Parchment or baking mats
Cooling rack
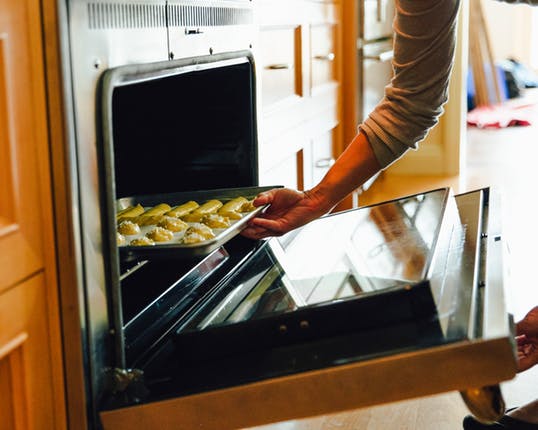
Heat the oven to 425°F. Line a baking sheet with parchment or baking mats. Cut the butter into small pieces — this makes sure it melts quickly and evenly.
Bring the butter, water, and salt to a rolling boil: Combine the butter, water, and salt in a saucepan. Place over high heat and bring to a rolling boil. The butter should be completely melted by the time the water comes to a boil; if not, reduce the heat until the butter has melted to avoid too much water evaporating, then bring it back to a boil.
Add the flour: Take the pan off the heat and add the flour all at once.
Stir vigorously to form a dough: Make sure all the flour is worked into the dough and no more dry flour remains. Once ready, the dough will resemble mashed potatoes.
Cook the dough on the stove: Place the pan back over medium heat. Stir the dough, mashing it against the sides and bottom of the pan and then gathering it up into a ball again — this dries out the dough and cooks the flour. Some starchy buildup on the bottom of the pan is normal. Continue cooking the dough for 3 to 5 minutes. The dough is ready when it pulls away from the sides of the pan to form a ball, the surface looks shiny and glossy, and it's thick enough that you can stand a spoon upright in the middle.
Cool the dough: Transfer the dough to the bowl of a stand mixer with a paddle attachment. Beat on medium-low speed until the dough is just warm to the touch. The outside of the bowl should also be just slightly warm to the touch. Alternatively, you can cool the dough by hand with a stiff spatula.
Add three of the eggs: Whisk the eggs together in a small bowl. With the mixer on medium-low, add the eggs to the dough in four separate additions. (This can also be done by hand with a stiff spatula.) As each addition is worked in, the dough will at first become stringy and goopy, then will form back together into a soft dough. Scrape down the sides of the bowl as needed between each addition.
Check the dough: After the third addition, check the dough before adding the fourth. When the paste is ready, the dough should be soft, creamy-colored, and very smooth. It should also hold its shape when scooped. If you scoop up a little bit with your spatula and let it slide back into the bowl, it should leave behind a little "V" of dough on the spatula. Add the fourth egg, or just half of the fourth egg, if needed.
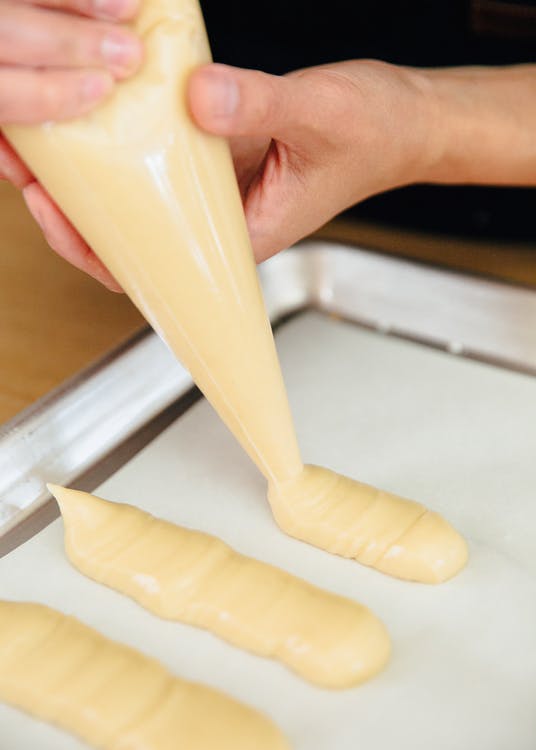
Portion the dough onto the baking sheet: Scoop the dough out onto the baking sheet. You can also transfer the dough to a piping bag to pipe specific shapes. The dough can be made into nearly any size or shape. Space the puffs slightly apart on the baking sheet.
Brush the tops of the puffs with egg wash: This makes the puffs golden. Sprinkle the tops with pearl sugar, if desired.
Bake for 12 to 15 minutes, then turn down the oven temp to 375°F: When the pastries look puffed, after 12 to 15 minutes, then lower the heat to continue baking.
Bake another 18 to 20 minutes: Exact baking time will depend on the size and shape of your puffs. Bake until the puffs are slightly puffed, golden-brown in color, and dry to the touch. They will detach easily from the parchment and feel hollow and light when you pick them up.
Lower the heat to 300°F and dry out the puffs: Continue baking the puffs to dry them out another 15 minutes or so. If you break one of the puffs open, it should not be wet or eggy on the inside; bake a few more minutes as needed.
Poke the puffs with a toothpick: Transfer the puffs to a cooling rack and poke each one with a toothpick or the point of a paring knife. This releases any lingering steam from the inside and helps prevent the puffs from getting soggy.
Cool the puffs completely: Once completely cool, the puffs can be filled or used for any recipe. Unfilled puffs can be kept in an airtight container for several days, or frozen for up to 3 months.
NOTES:
Make-ahead pâte à choux: The choux dough can be refrigerated for up to 3 days or frozen for up to 3 months before baking; thaw the dough overnight in the fridge before using. The shaped or piped pastries can also be frozen for up to 3 months and baked straight from the freezer.
- www.youtube.com
- www.foodnetwork.com
- www.joyofbaking.com
- www.marmiton.org
- www.steamykitchen.com
- www.thekitchn.com
- www.foodandwine.com
- www.devilsfoodkitchen.com
- www.marthastewart.com
 Alice Osborne
Weekly Newsletter Contributor since 2006
Email the author! alice@dvo.com