

10 Easy and Inexpensive Christmas Decorations Straight From The Kitchen
By Calli Rhoades
 When my husband and I were first married we lived in the basement of my brother's home. We desperately wanted the feeling of being our own little family, but always felt like we were playing house a bit.
In an effort to help our humble little space feel more like home my in-laws gave us their old artificial Christmas tree. It was wonderful to have a tree and be able to start building our own holiday cheer and traditions in our own home – without feeling like we were just guests in my brother's Christmas story. The only problem was that the tree had occupied a prominent spot in their rather large living room, so it was a rather large, full tree. We had a giant tree in a tiny living room and an even tinier budget to decorate it with!
First I started with the old popcorn garland idea and then I baked gingerbread cookies shaped like hearts and stars. Then, I decided to bundle cinnamon sticks (purchased at the dollar store, no less) and tie them with ribbon. Finally I came up with what I still think was my best idea – dehydrated orange slices hung from the tree. When the tiny little Christmas light bulbs would shine through the thin oranges it was just beautiful.
Every time I started on a new project or got excited about a new idea my husband would chuckle a bit. I like to think it was him chuckling at his amazing wife's ingenuity and brilliantly clever, frugal mind, but I am fairly sure it was one of those, "oh no, here comes a mess" grins I have become so familiar with since then!
Over the years we added to this and changed that, but those homemade ornaments stuck with us for a lot of years. Some held up from year to year, and some I would recreate each year. I really loved that tree and everything it came to represent for our family. It was a symbol of what beauty we could create even when we were making due.
Now our tree is different and consists of more things the kids have made and chosen, but we still use some of those same ideas to decorate around our home each year. Now, instead of my husband and I sitting there creating them, it is a whole family. It is a much louder process these days with the kids laughing, Christmas songs being sung, and undoubtedly some sibling arguing just to keep us balanced, but it still brings a sense of joy and accomplishment when we can hang our decorations, knowing we made them with our own hands... as little as they may be.
I want to share 10 of my favorites and I hope that if you choose to make any this holiday season that they will bring you and yours a bit of the Christmas spirit we have come to enjoy in our home!
From our home to yours:
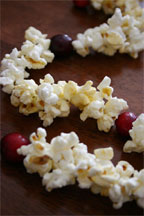
Popcorn Garland– Thread a needle, but don't cut the thread off the spool just yet. You may be surprised at just how much thread it takes to go around and around a tree. If you are making the garland for a space other that a tree than you may need less thread. Carefully add one piece of popcorn at a time over the needle. Keep sliding it down to make room for the new ones until you reach the length you want. When you are finished, tie off the ends. Shhh…I won't tell that you've been snacking on the popcorn this whole time! Hint: Day-old popcorn breaks apart less.
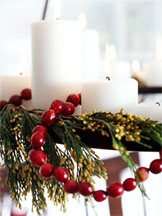 Cranberry Garland– Same as the popcorn garland, but be careful to not stain anything with the cranberry juice. Use a strong thread or fishing line and string them using the same needle technique.
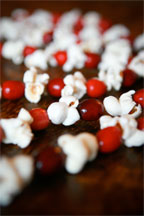 Cranberry and Popcorn Garland– This is my favorite! Alternate popcorn and cranberries. You can do every other or one cranberry for every 3 popcorn pieces, whatever you like.
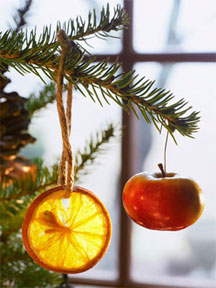 Orange Ornaments- Cut oranges crosswise into 3/4-inch slices to create a pinwheel effect, keeping them as uniform as possible in thickness. Lay on a baking sheet or aluminum foil in the oven set at the lowest temperature (around 150 degrees F). Leave them to bake for about four hours, then turn with a spatula, checking them every hour until they seem almost dry with a bit of moisture left so they still have an orange color (they will continue to dry at room temperature). Create a tiny hole in the top of each slice with a small paring knife, and string twine through each to hang on your tree.
Sweet Lady Apples- When picking these mini apples, try to choose the ones that are 2 inches across or smaller so they're not too bulky (or heavy) to hang from the branches of your tree. To hang: Take a piece of floral wire long enough to poke about one third of the way through the apple (or until it feels secure), and leave enough wire to hook at the top to hang on your tree.
 Cinnamon Stick Bundles– As simple as the name suggests. Just bundle 3 or 4 sticks together and tie up with a cute ribbon.
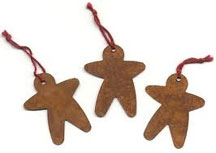
Gingerbread Cookies– Make sure to make a little hole in the top (for the ribbon) while they are fresh from the oven and still soft. If you try later they will break! If you want them edible then they will probably be more brittle. There are recipes just for ornaments that look and smell like the real deal, but are much harder and are intended just for decorating.
Gingerbread Cookie Ornaments
 1/2 c. butter
1/2 c. sugar
1/2 c. Mrs. Butterworth's syrup
2 c. unsifted flour
1 1/2 tsp. baking powder
1 tsp. ground cinnamon
1/2 tsp salt
1 tsp. ground ginger
In medium bowl cream butter, sugar and syrup. Sift dry ingredients together; blend into creamed mixture. Chill 30 minutes. Roll dough on floured board to 1/8 inch thickness, cut with cookie cutter. Place on ungreased cookie sheet. Bake in a 350 degree oven 8 to 10 minutes. Cool on wire racks. Yield: 2 dozen (5 1/2-inch) cookies).

 Candy Canes- No, I'm don't have a recipe for these, but they fit in the same category and they are adorable to decorate with – and did I mention cheap? Add some fun by hanging them from the tree, filling a small vase, or hanging them along the garland.
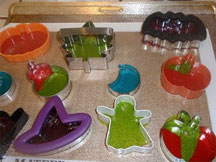 Stained Glass Candy Ornaments– Preheat oven to 325. Use metal cookie cutters. Arrange candy inside cookie cutter in design you want. Brightly colored hard candies work best. Place in oven until they have melted and smoothed out. Remove from oven and punch ribbon hole before candy hardens. These are beautiful and fun... and totally edible!
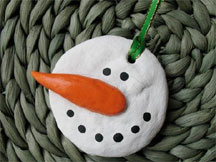
Salt Dough Ornaments
 1 1/4 cups boiling water
1 cup salt
4 cups flour
Pour the boiling water over the salt and stir. Allow to cool, then add the flour. Mix well, forming a ball. Knead until the dough is soft and workable. Roll the dough on a floured surface. Cut with your favorite cookie cutters into desired shapes. Make a hole in the top of each one for hanging. A thin drinking straw works well for this. Place the cut out dough on a cookie sheet lined with foil. Bake at 175º for 2 hours or until the dough becomes hard. When thoroughly cooled and dry, paint and decorate the ornaments with acrylic craft paint. After the paint is dry, wait 24 hours, then spray with 2 or 3 coats of clear acrylic paint. Allowing complete drying between coats. Tie a small piece of ribbon or yarn through the hole for hanging.
Salt dough ornaments are strictly for decorations and crafts. They are NOT for eating.
Make sure all of your edible decorations are away from pets and little children. Our dog ate a few gingerbread cookies one year! Happy Holidays!