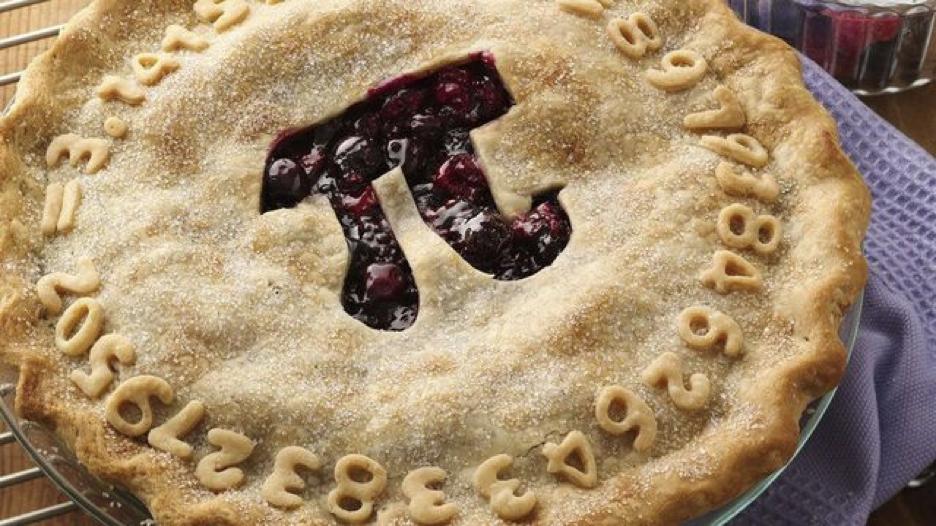
YAY for Pi (and PIE!)!
Were you aware that March 14 is National Pi Day? This special day celebrates Pi, a mathematical concept and a number that never ends (at least no person nor any computer has found the end yet). Typically, it’s rounded off to 3.14 (hence this March designation). If you are a mathematician, this is your day. It became a National day of celebration in 2009, and you brainiacs can thank the U.S. House of Representatives for passing this non-binding resolution (HRES 224) with a unanimous vote.
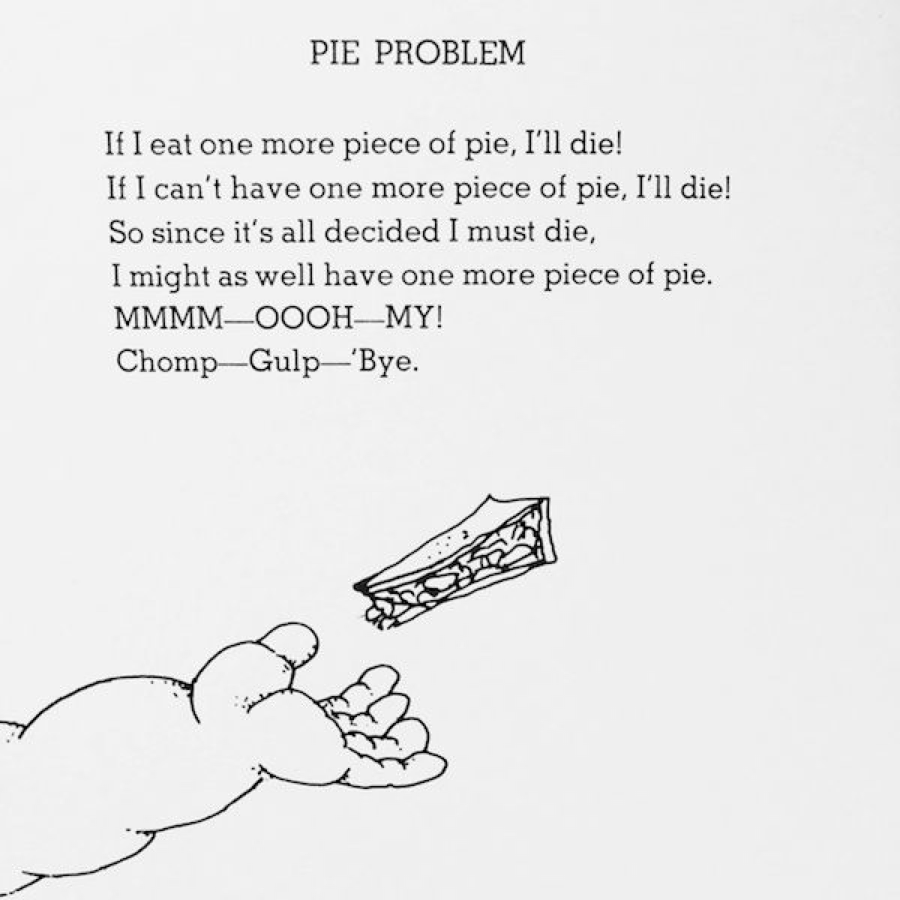
While it’s a breath-taking day for mathematicians, it’s also a hoot of a day for avid cooks and bakers. Oh, do we love a good excuse to bake up some pie! In fact, a remarkably funny poet, the late Shel Silverstein said it best:
Since we’re talking about the wonderfulness of pie, let’s explore how to perfect the vital skill of making the flakiest crust known to man. Now I know very well we have stellar pie-makers amongst our Cook’n readers, but just in case we have some novice bakers joining our league, here are 10 tried-and-true tips for making the best pie crust ever. We’ll thank the folks at www.thespruceeats.com for this timely help (which I’m quoting).
1. Use Very Cold Butter or Fat. Butter, shortening, or lard—whatever fat the recipe calls for should be well-chilled and cut into small pieces to start with for the flakiest crust in the end. The fat in a pie crust must maintain some of its integrity in the dough to make the crust truly flaky. Starting with very cold fat makes it easier to keep from overworking the fat into the dough. On a hot day, freeze the fat for 10 to 15 minutes before you start making the dough.
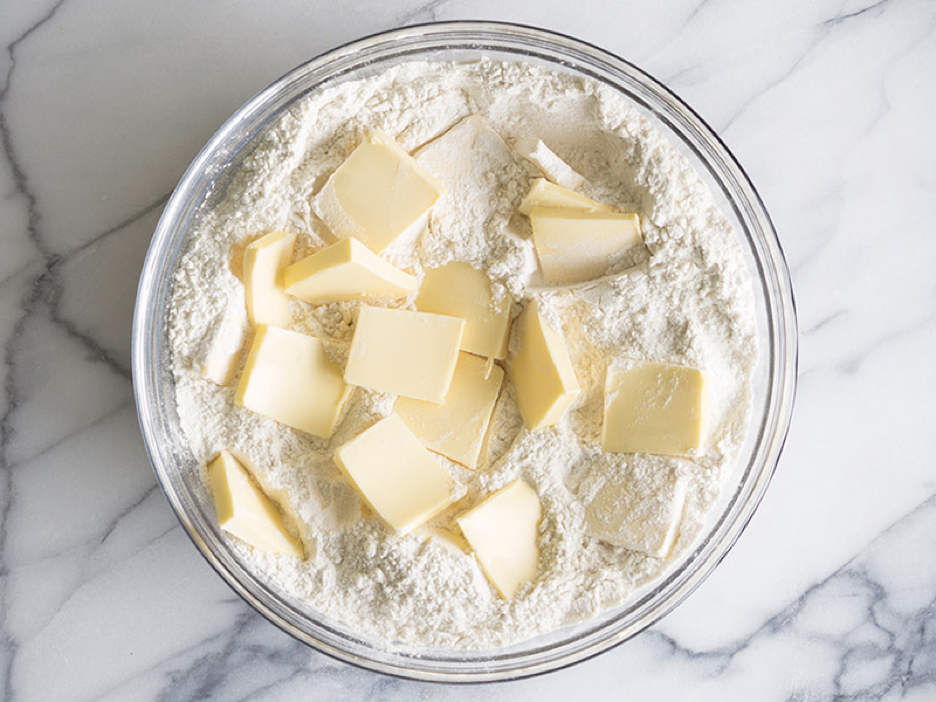
2. Retain Some Chunks. Most recipes say to work the fat into the flour until the mixture resembles coarse cornmeal. Just be sure the dough has a few larger fat chunks to ensure optimum flakiness. As it heats up, the fat creates steam, causing little pockets of air that create the flaky character. Also, keeping a few bigger fat pieces prevents overworking the dough.
3. Limit the Water. Start by using the minimum amount of water or other liquid the recipe calls for. Water aids gluten development, which you want to avoid for a tender pie crust. Add just enough liquid so the dough holds together when you pinch a piece between your fingers. The dough should look quite shaggy.
One way to limit the water? Use vodka instead—it contains less water by volume than actual water and the alcohol bakes off.
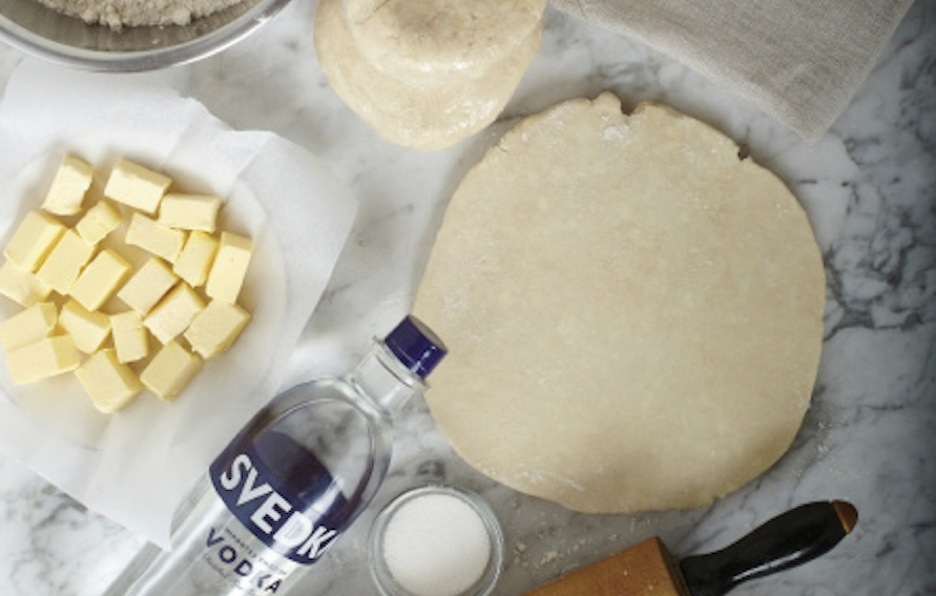
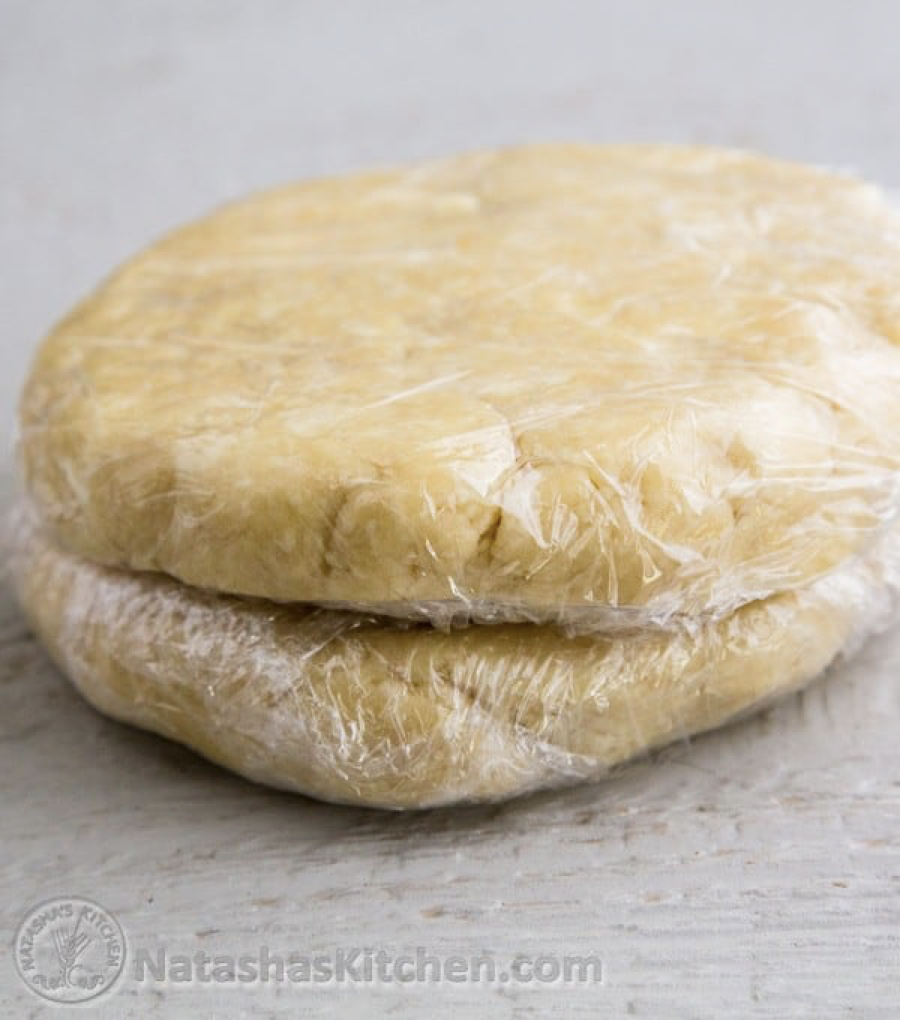
4. Make a Disk. Before chilling or rolling out the dough, take the time to shape it into an even disk less than 1-inch thick and with smooth edges. Well-floured hands and a well-floured work surface make this easier. This step makes the dough much easier to roll out quickly and evenly and helps prevent cracking on the edges.
5. Chill the Dough. Wrap and chill it at least 20 minutes before you roll it, and for at least 30 minutes (and up to 2 days). Again, on a very hot day, you may want to put the dough in the freezer for about 10 minutes just before you start to roll it out.
6. Roll the Dough, Turn the Dough. Roll out the dough on a well-floured work surface with a well-floured rolling pin. With each pass of the rolling pin, turn the dough a quarter turn (about 90 degrees). This alerts you if the dough starts to stick. In that case, lift up one side and throw a bit of flour underneath.
7. Think Curbs, Not Driveways. Roll out and away from yourself, then pick up the rolling pin to start from the center again. Roll in one direction only. Back and forth rolling creates gluten strands, which will then result in a tough crust. Be careful to keep even pressure on the rolling pin across the entire circle of dough so the edges of the dough remain as thick as the center—you want curbs, not driveways.
8. Let the Dough Fall Into the Pan. When placing the dough, lower the dough loosely into the pan, letting the dough fall down into the creases at the edge rather than pushing or forcing it. Stretched dough simply pulls back to its original shape when you bake it.

9. Chill the Lined Pie Pan. Cover and chill the lined pie pan (and any rolled out top crust) before blind-baking or filling the pie. This helps the pie keep its shape (and size!) when baked.
10. Bake Until Brown. To achieve full tenderness and flakiness, be sure to bake the pie until the crust turns fully brown, not just golden.
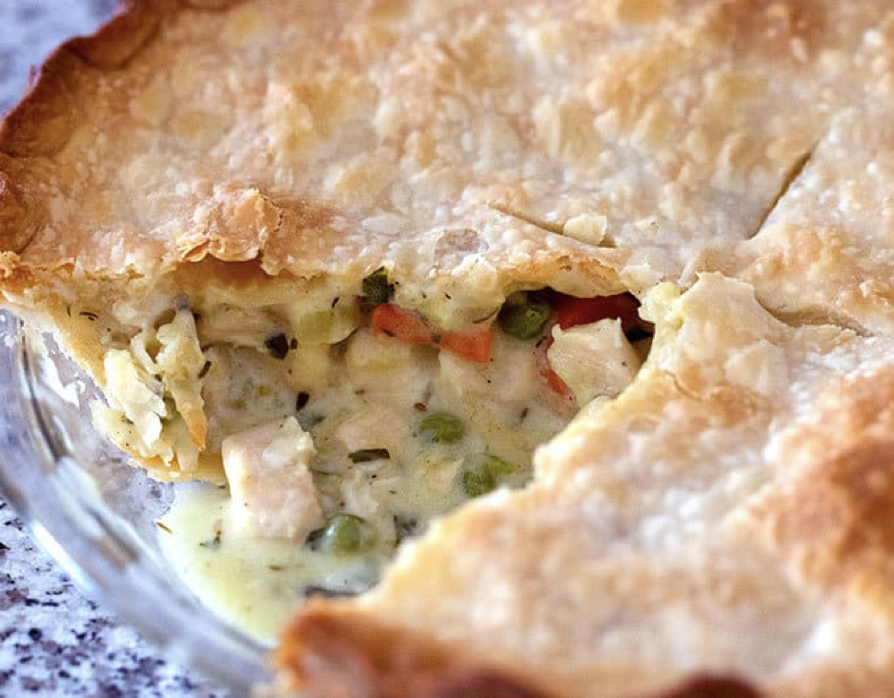
Now that you know how to make the best pie crust ever, let’s apply this skill to making a chicken pot pie. Here’s terrific recipe for one of the best fillings I’ve ever tasted. Pair your favorite crust recipe with the techniques above and fill your crust with this scrumptious filling. YAY for Pi (and Pie!)!
4 tablespoons butter, unsalted
1 pound skinless chicken breasts, cut into small bite size pieces
1 cup carrots, sliced
1/2 cup celery, sliced
1/2 cup yellow onions, chopped
1 1/4 teaspoons salt
1/2 teaspoon garlic powder
1/2 teaspoon thyme, dried
1/4 teaspoon ground black pepper
1/4 cup all-purpose flour
1/2 cup heavy cream
1 cup chicken broth
1/2 cup frozen green peas
2 tablespoons flat-leaf parsley, minced
2 (1 top and 1 bottom) pie crusts, unbaked
Directions:
Add Recipe to Cook'n
NOTES:
*Pouring hot filling into the unbaked pie crust will make the crust soggy. You could make the filling up to 3 days ahead of time and store it in a sealed container in the refrigerator. **The longer the pot pie can cool before slicing, the thicker/less runny the filling will be.
While it’s a breath-taking day for mathematicians, it’s also a hoot of a day for avid cooks and bakers. Oh, do we love a good excuse to bake up some pie! In fact, a remarkably funny poet, the late Shel Silverstein said it best:
Since we’re talking about the wonderfulness of pie, let’s explore how to perfect the vital skill of making the flakiest crust known to man. Now I know very well we have stellar pie-makers amongst our Cook’n readers, but just in case we have some novice bakers joining our league, here are 10 tried-and-true tips for making the best pie crust ever. We’ll thank the folks at www.thespruceeats.com for this timely help (which I’m quoting).
1. Use Very Cold Butter or Fat. Butter, shortening, or lard—whatever fat the recipe calls for should be well-chilled and cut into small pieces to start with for the flakiest crust in the end. The fat in a pie crust must maintain some of its integrity in the dough to make the crust truly flaky. Starting with very cold fat makes it easier to keep from overworking the fat into the dough. On a hot day, freeze the fat for 10 to 15 minutes before you start making the dough.
2. Retain Some Chunks. Most recipes say to work the fat into the flour until the mixture resembles coarse cornmeal. Just be sure the dough has a few larger fat chunks to ensure optimum flakiness. As it heats up, the fat creates steam, causing little pockets of air that create the flaky character. Also, keeping a few bigger fat pieces prevents overworking the dough.
3. Limit the Water. Start by using the minimum amount of water or other liquid the recipe calls for. Water aids gluten development, which you want to avoid for a tender pie crust. Add just enough liquid so the dough holds together when you pinch a piece between your fingers. The dough should look quite shaggy.
One way to limit the water? Use vodka instead—it contains less water by volume than actual water and the alcohol bakes off.
4. Make a Disk. Before chilling or rolling out the dough, take the time to shape it into an even disk less than 1-inch thick and with smooth edges. Well-floured hands and a well-floured work surface make this easier. This step makes the dough much easier to roll out quickly and evenly and helps prevent cracking on the edges.
5. Chill the Dough. Wrap and chill it at least 20 minutes before you roll it, and for at least 30 minutes (and up to 2 days). Again, on a very hot day, you may want to put the dough in the freezer for about 10 minutes just before you start to roll it out.
6. Roll the Dough, Turn the Dough. Roll out the dough on a well-floured work surface with a well-floured rolling pin. With each pass of the rolling pin, turn the dough a quarter turn (about 90 degrees). This alerts you if the dough starts to stick. In that case, lift up one side and throw a bit of flour underneath.
7. Think Curbs, Not Driveways. Roll out and away from yourself, then pick up the rolling pin to start from the center again. Roll in one direction only. Back and forth rolling creates gluten strands, which will then result in a tough crust. Be careful to keep even pressure on the rolling pin across the entire circle of dough so the edges of the dough remain as thick as the center—you want curbs, not driveways.
8. Let the Dough Fall Into the Pan. When placing the dough, lower the dough loosely into the pan, letting the dough fall down into the creases at the edge rather than pushing or forcing it. Stretched dough simply pulls back to its original shape when you bake it.
9. Chill the Lined Pie Pan. Cover and chill the lined pie pan (and any rolled out top crust) before blind-baking or filling the pie. This helps the pie keep its shape (and size!) when baked.
10. Bake Until Brown. To achieve full tenderness and flakiness, be sure to bake the pie until the crust turns fully brown, not just golden.
Now that you know how to make the best pie crust ever, let’s apply this skill to making a chicken pot pie. Here’s terrific recipe for one of the best fillings I’ve ever tasted. Pair your favorite crust recipe with the techniques above and fill your crust with this scrumptious filling. YAY for Pi (and Pie!)!
The Best Chicken Pot Pie Filling
Ingredients:
4 tablespoons butter, unsalted
1 pound skinless chicken breasts, cut into small bite size pieces
1 cup carrots, sliced
1/2 cup celery, sliced
1/2 cup yellow onions, chopped
1 1/4 teaspoons salt
1/2 teaspoon garlic powder
1/2 teaspoon thyme, dried
1/4 teaspoon ground black pepper
1/4 cup all-purpose flour
1/2 cup heavy cream
1 cup chicken broth
1/2 cup frozen green peas
2 tablespoons flat-leaf parsley, minced
2 (1 top and 1 bottom) pie crusts, unbaked
Directions:
1. Be sure there is an oven rack on the bottom rack of the oven. Preheat oven to 425 degrees F.
2. Add the butter to a large skillet over medium heat. Once the butter is melted, add the chicken,
carrots, celery, onion, salt, garlic powder, thyme leaves, and pepper. Cook for 8-10 minutes,
until the chicken is cooked through, stirring often.
3. Add the flour. Stir well, until no dry flour remains. Slowly stir in the cream, then the chicken
broth. Cook until bubbling and thick, stirring often, 3-4 minutes.
4. Remove from the heat. Stir in the peas and flat leaf parsley. Let this cool for 15-30 minutes
before filling the pie.*
5. Fit one pie crust into a 9-inch pie plate. Spoon the cooled filling into the pie crust. Top with
the second pie crust. Seal the edges of the pie crust together. Cut 3-4 slits in the top crust to
allow steam to escape.
6. Place the filled pie plate on a baking sheet. Bake for 30 minutes on the bottom rack of the
oven.
7. Cool for 15-30 minutes before slicing and serving.**
Recipe formatted with the Cook'n Recipe Software from DVO Enterprises.
NOTES:
*Pouring hot filling into the unbaked pie crust will make the crust soggy. You could make the filling up to 3 days ahead of time and store it in a sealed container in the refrigerator. **The longer the pot pie can cool before slicing, the thicker/less runny the filling will be.
Sources:
www.delish.com
www.bakefromscratch.com
www.ediblesiliconvalley.ediblecommunities.com
www.natashaskitchen.com
www.finecooking.com
www.thewholesomedish.com
 Alice Osborne
Weekly Newsletter Contributor since 2006
Email the author! alice@dvo.com