The Pioneer Woman’s Maple Cinnamon Rolls
Raise your hand if fall is your favorite time of year! Woot Woot! It is mine and I think it is for a lot of people. While it is still pretty hot where I live, it’s September so to me that equals fall, no matter if the temperature tells me otherwise. And to me, fall also means it is the season of baking and baking lots of things with pumpkin, warm spices, and delicious breads.
Now if there is one baked good weakness I have that no matter how much will power I think I have I could NEVER turn down, it is cinnamon rolls.
Now, icing or cream cheese frosting, you might ask? Mini or ginormous? Raisins and nuts, or plain? Any and all of the above! I pretty much love it all. Now, my first and foremost reason for looking for a new cinnamon roll recipe this time was to find one that was eggless so my daughter could enjoy my favorite sweet treat as well. And never have I been more excited to come across a recipe that is not only eggless, but also turned out to be the best cinnamon rolls I have ever made. And it comes from one of my favorite people I go to for some of the best home cooking recipes, reminiscent of the food my mom made for us growing up: the one and only Pioneer Woman.
Ree claims that her mother made these for friends and neighbors every year for Christmas “and you could literally hear the primal groans of pure joy rising from the rooftops of our town. I’ve carried on the tradition through the years and have won friends and influenced people just by delivering these rolls. They really are that good.”
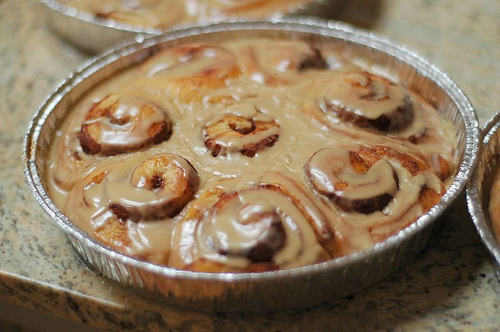
The actual roll part is soft and delicious and the icing is really what sets these babies apart from other cinnamon rolls you’ve had in the past. It is a maple icing so this is truly heaven to me since it’s like combining my favorite treat with my other favorite treat—fresh maple bars. Does it get any better than that? The icing has powdered sugar, maple flavoring, milk, melted butter, brewed coffee, and salt. I actually left the coffee out since I’m not a coffee drinker and they were still out of this world. I’m sure the coffee just brings out the maple and other flavors even more and would make them even yummier!
This is a really ginormous recipe that ends up making about 7 pans of cinnamon rolls so you can use your Cook’n software to decrease the recipe to make it more of a normal size for just one batch.
I hope you try to give these a whirl. They take a bit of time, but they are worth it! And now a final word from Ree…”After making these you’ll be another step closer to being the most popular person in town…or the jiggliest, depending on whether you choose to deliver the rolls to friends or lock yourself in your pantry and eat them all by yourself.”
Couldn’t have said it better myself, Ree! Goodbye my friends. Sorry if it is my fault you become jigglier! :)
Maple Cinnamon Rolls
Ingredients:
- 1 quart Whole Milk
- 1 cup Vegetable Oil
- 1 cup Sugar
· 2 packages Active Dry Yeast, 0.25 Ounce Packets
· 8 cups (Plus 1 Cup Extra, Reserved) All-purpose Flour
· 1 teaspoon (heaping) Baking Powder
· 1 teaspoon (scant) Baking Soda
· 1 Tablespoon (heaping) Salt
- Plenty Of Melted Butter
- 2 cups Sugar
- Generous Sprinkling Of Cinnamon
_____
- MAPLE FROSTING:
- 1 bag Powdered Sugar
· 2 teaspoons Maple Flavoring
- 1/2 cup Milk
- 1/4 cup Melted Butter
- 1/4 cup Brewed Coffee
- 1/8 teaspoon Salt
For the dough, heat the milk, vegetable oil, and sugar in a medium saucepan over medium heat to just below a boil. Set aside and cool to warm. Sprinkle the
yeast on top and let it sit on the milk for 1 minute.
Add 8 cups of the flour. Stir until just combined, then cover with a clean kitchen towel, and set aside in a relatively warm place for 1 hour. After 1
hour, remove the towel and add the baking powder, baking soda, salt, and the remaining 1 cup flour. Stir thoroughly to combine. Use the dough right away,
or place in a mixing bowl and refrigerate for up to 3 days, punching down the dough if it rises to the top of the bowl. (Note: dough is easier to work with
if it’s been chilled for at least an hour or so beforehand.)
Preheat the oven to 375°F.
To assemble the rolls, remove half the dough from the pan/bowl. On a floured baking surface, roll the dough into a large rectangle, about 30 x 10 inches.
The dough should be rolled very thin.
To make the filling, pour 3/4 cup to 1 cup of the melted butter over the surface of the dough. Use your fingers to spread the butter evenly. Generously
sprinkle half of the ground cinnamon and 1 cup of the sugar over the butter. Don’t be afraid to drizzle on more butter or more sugar! Gooey is the goal.
Now, beginning at the end farthest from you, roll the rectangle tightly towards you. Use both hands and work slowly, being careful to keep the roll tight.
Don’t worry if the filling oozes as you work; that just means the rolls are going to be divine. When you reach the end, pinch the seam together and flip
the roll so that the seam is face down. When you’re finished, you’ll wind up with one long buttery, cinnamony, sugary, gooey log.
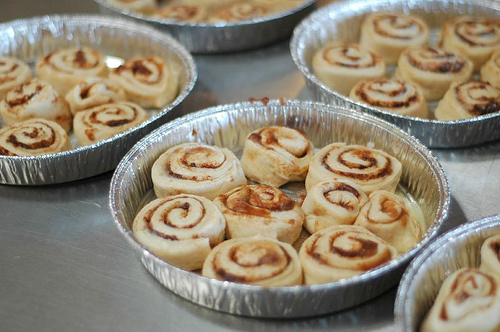
Slip a cutting board underneath the roll and with a sharp knife, make 1/2-inch slices. One “log “will produce 20 to 25 rolls. Pour a couple of teaspoons of
melted butter into disposable foil cake pans and swirl to coat. Place the sliced rolls in the pans, being careful not to overcrowd. (Each pan will hold 7
to 9 rolls.)
Repeat the rolling/sugar/butter process with the other half of the dough and more pans. Preheat the oven to 375°F. Cover all the pans with a kitchen towel
and set aside to rise on the countertop for at least 20 minutes before baking. Remove the towel and bake for 15 to 18 minutes, until golden brown. Don’t
allow the rolls to become overly brown.
While the rolls are baking, make the maple icing: In a large bowl, whisk together the powdered sugar, milk, butter, coffee, and salt. Splash in the maple
flavoring. Whisk until very smooth. Taste and add in more maple, sugar, butter, or other ingredients as needed until the icing reaches the desired
consistency. The icing should be somewhat thick but still very pourable.
Remove pans from the oven. Immediately drizzle icing over the top. Be sure to get it all around the edges and over the top. As they sit, the rolls will
absorb some of the icing’s moisture and flavor. They only get better with time… not that they last for more than a few seconds. Make them for a friend
today! It’ll seal the relationship for life. I promise.
- www.thepioneerwoman.com
 Mary Richardson
Weekly Newsletter Contributor since 2014
Email the author! mary@dvo.com