Meal Planning Has Never Been Easier!

I recently asked all of you what you wanted to learn more about in regards to our fabulous Cook’n program, and one feature that definitely needs some attention is the super meal planning feature! If you have ever meal planned, you know it saves money and sanity later in the week;). But it’s not always the easiest thing to do upfront- it takes time, and consistency! Luckily, Cook’n has made it so easy to create a meal plan from recipes you know and love or recipes you’ve been dying to try!
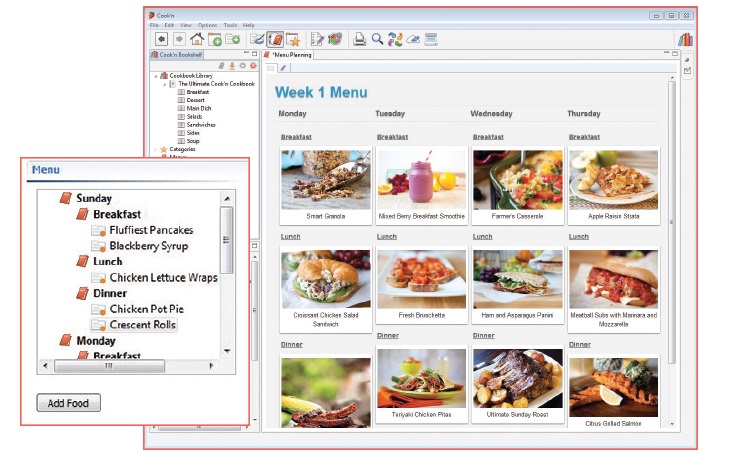
At the toolbar at the top, there is an icon with a dinner plate, spoon, and cookbook. Click on this to bring you to the meal planning perspective. You can also right click on the Menus tab underneath all your cookbooks to pull up the same window. It will automatically be on the edit setting, just like when opening a new recipe. This will allow you to create a menu completely customized for whatever your needs are. On the right there are some labels already created for you. To create your menu, simply click on a label and drag it to the empty box on the left.
Once you have created a menu template, you can save it. Create a name for it at the top, and click the save button on the bottom. I love this because you can use a template over and over (for example, your weekly food menu or weekly Sunday dinner menu) without having to start from scratch. Talk about a time-saver! On the left, under all your cookbooks, you’ll see another tab that says menus. You will see your customized menus here, as well as some basic templates that have already been created for your convenience (weekly menu template, meal template, etc). To add a recipe to your menu, simply find it in the cookbooks on the left, and drag it over to the appropriate place in your menu.
Once your menu is complete, you can click the view menu tab (like you would on a recipe) toyou’re your complete menu. I love that it shows the pictures so it’s a great way to quickly glance at your menu and know exactly what’s going on!
I have included a tutorial here that Dan put together a few years back about the meal planning feature- I organize mine a little differently, but that’s exactly why this feature is so cool! You make it your own! In this tutorial, Dan puts the meals that he’d like to have in the menu box first, and then organizes a template. There is no right or wrong way- whatever works for you is best! My biggest piece of advice with the meal planning is to simply play around with it! You’re going to have a different style than I do, and you’ll figure out a system that works for you:).
Whether you’re trying to plan out a week’s worth of food and just want to think about dinner, or maybe you’re planning your Christmas Day menu, or maybe you’re trying to plan out every meal because you’re going on a special diet, you can create your own labels and make your meal plan as detailed as you want it to be! You can use the meal planning for so many things. Obviously it’s super helpful when trying to plan meals before grocery shopping for the week; try using it the next time you have to prepare a big meal (like Thanksgiving dinner or your 4th of July BBQ). You can also use it for vacation purposes- we recently spent a week in Oceanside and Cook’n’s meal planning feature is the perfect way to plan out your meals and keep everything organized! Use it when planning food for a baby shower or wedding, or even someone’s birthday menu! It’s a great tool to use whenever you want to keep track of what food you’ll be serving because the recipes are so readily accessible and you’ll have already done all the thinking! Not only that, but you’ll be able to create a handy shopping list from your menu- something we’ll go into later;).
How have you guys used the meal planning feature? How do you organize it? What suggestions would you have for someone who’s just starting to learn about it? Share your thoughts in the comments below!
 Camille Hoffmann
Weekly Newsletter Contributor since 2014
Email the author! camille@dvo.com
