
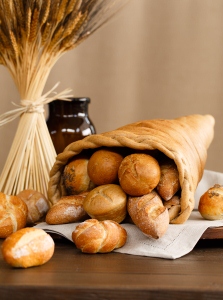
If you read the article THE Best Way to Celebrate, then you heard of the awe-inspiring masterpiece of a centerpiece: the cornucopia. Oh, but don't be dismayed, this is not just any cornucopia, it's The Breaded Cornucopia.
It's an interesting concept, it sounds to me like it might just break and fall apart. But I'm here as a literal eye-witness that it is possible. I have seen it done, and it was wonderful. So I figured I talked a lot about how amazing it was according to my childhood memory, that I thought it would be nice to explain how to do it.
Hopefully the pictures will be helpful in describing its sensational appearance and step-by-step process.
You'll Need:
- Aluminum Foil
- Non-stick cooking spray
- Refrigerated Bread stick dough, 3 (11 oz.) containers
- 2 eggs
- Pastry Brush
- Objects to stuff Cornucopia (ex: fruit, rolls, etc)
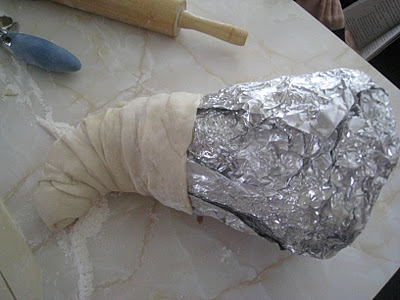
- Shape your Cornucopia
- Roll a piece of foil into a cone shape. The website I looked at suggested using 30" by 20" piece of foil and making a 6 to 8 inch opening. However, if you would like it bigger or smaller, that's great, too!
- Stuff your cone with foil to keep it from flattening.
- Bend the tail if you would like it to look more like a cornucopia.
- Make sure cone is smooth, wrap more foil around it if needed.
- Wrap your Cornucopia
- Spray cone with non-stick cooking spray.
- Using refrigerated breadstick dough (Homemade is probably fine, too), take each "breadstick" and roll it flat. 1/8 inch to 1/4 inch thick.
- Begin wrapping, starting from the tail end.
- When you start a new strip, pinch ends together so it looks like one continuous piece of dough.
- Overlap each spiral 1/4 inch to 1/2 inch to keep holes from forming
- You can be creative and weave your bread like a basket, twirl it, or braid it.
- Bake your Cornucopia
- Mix 2 eggs. Use a pastry brush to coat the Cornucopia entirely with the egg mixture.
- Bake at 350 degrees Fahrenheit, 35-40 minutes.
- Check on it often so the masterpiece doesn't burn. Time may vary depending on temperatures and dough used.
- Create your Cornucopia
- Remove foil very carefully
- Place on table with cloth or something similar beneath
- Stuff cornucopia with anything you desire. Fruit, Vegetables, mini pumpkins, candy, napkins, you name it

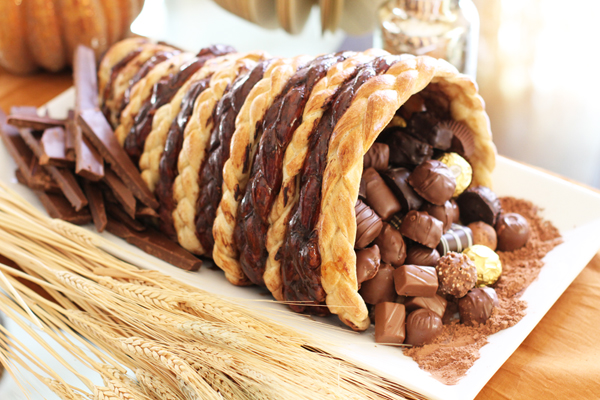
I think they are absolutely an eye-grabber. I can just picture people's faces at the dinner table: priceless. Do you want to know my favorite part about it all, though? The fact that the incredible centerpiece sitting on the table is edible! I'm a true lover of food and goodies (I'm the kind that still has Christmas candies at Easter time, because I want it to last). I savor all flavor. So if you put something in front of me that's beautiful and that can be eaten, I am in culinary heaven.
I'd love to hear if any of you have variations on the cornucopia that you have done or want to try. I even saw miniature ones stuffed with sandwich meat and lettuce. What would you stuff it with? How would you glaze it? What shape would you use? Etc. Make our bellies grumble and our eyes cry with joy.
- https://www.instructables.com/id/Bread-Cornucopia-Thanksgiving-Centerpiece/all/?lang=es
- https://www.breadworld.com/Recipe.aspx?id=992
- https://cookingwithkaryn.blogspot.com/2011/11/what-makes-you-say-mmmmm-4-and-bread.html
- https://www.chicaandjo.com/2009/11/16/make-a-bread-cornucopia/
- https://www.lilyshop.com/how-make-cornucopia

Sydney Hill
Weekly Newsletter Contributer since 2012
