
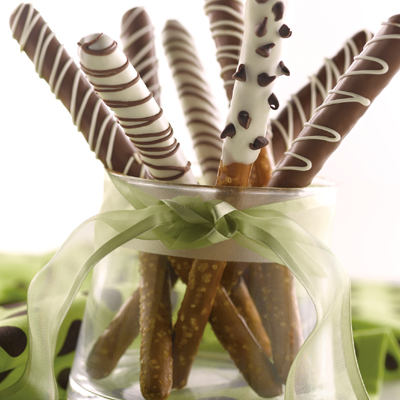
We all know how good pretzel sticks are when dipped in caramel, coated in chocolate and then decorated. They're one of my all time favorite treats. But the other day I ran on to some cute things one cook was using them for to get ready for Halloween.
On a fun family blog, www.chickabug.com, the author showed what several other family bloggers were doing to create some clever treats (all pictured below):
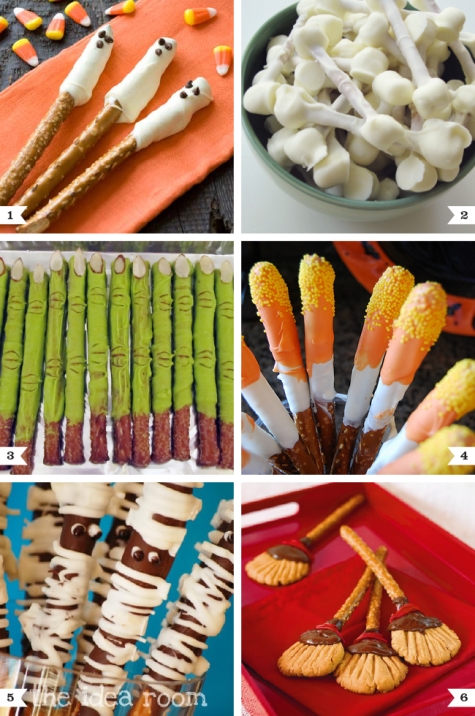
- Ghostly pretzel sticks via www.KitchenDaily.com
- Pretzel stick bones via www.inspireco.blogspot.com — you can make small bones using regular pretzel rods and mini marshmallows, or you can make large bones using pretzel rods and full-size marshmallows.
- Witches fingers pretzel rods via Deep in the Heart of Arkansas (www.gandcjohnson.blogspot.com) — the knuckle details and sliced almond "fingernails" are so wonderfully creepy!
- Candy corn pretzel rods via www.yourhomebasedmom.com.
- Mummy pretzel sticks via www.theidearoom.net.
- Witches' broomstick cookies (peanut butter cookies baked with pretzel sticks and decorated with chocolate) via www.readyseteat.com.
Amazing what you can do with a simple ol' pretzel rod, isn't it? Talk about great Halloween theme party food! And of course, all of these recipes are irresistibly salty-sweet, even the creepy witches' fingers. Eat them? if you dare!
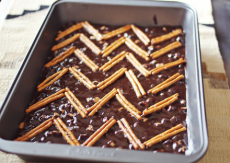 But apart from holiday funnery, pretzel sticks can add a snappy taste twist to traditional recipes. For instance, how about placing them atop a pan of brownie batter prior to baking? We already know chocolate and pretzels are wonderful together. Or decorating with them? I love the different patterns they can make as they're placed geometrically on a bed of icing.
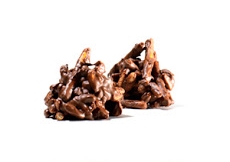 And mixing them into my no-bake cookie recipe creates what we call Peanut Butter Haystacks. That extra salty crunch just makes this cookie.
And speaking of cookies, here's an idea I found on www.yummily.com some time ago. The flavor combination is amazing and making these is super easy (see recipe below). So the next time you walk past that bag of pretzel sticks lingering on the grocery store shelf, just remember, this is one versatile snack and you might want to stock up on a few bags!
Peanut Butter Bon Bons
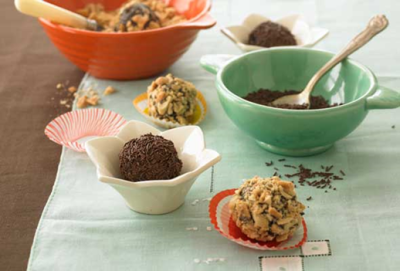
This combination of flavors and textures makes a memorable treat everyone will ask for over and over!
Serving size: 12
Calories per serving: 298
1/2 cup unsalted butter room temperature
2 cups confectioners' sugar sifted
2 cups creamy peanut butter
2 cups finely chopped pretzel sticks
1 cup Heath English toffee crushed; Heath Almond Brickle will work also
1 small bag semisweet chocolate chips finely chopped, melted with 4 tablespoons shortening or coconut oil
12 ounces confectionary coating, dark chocolate , melted (or 2 7-ounce tubs dipping chocolate)
1 cup salted peanuts finely chopped for rolling, optional
candy, colored sprinkles, for rolling; optional
Directions:
2. Cover and refrigerate the mixture until it is very firm, 2 to 3 hours. Roll the mixture, by heaping tablespoons, into 1-inch bonbons. Place on a parchment paper–lined baking sheet. Cover the bonbons with plastic wrap and freeze until they are very firm, about 30 minutes.
3. Combine the chopped chocolate and shortening, cut into small bits, on a large, microwave-safe dinner plate. Microwave at half-power for 1 minute. When melted, the chocolate will appear soft and shiny but will still hold its shape; stir smooth. If the chocolate is not completely melted, heat in 30-second increments, stirring until smooth. Transfer the chocolate to a medium bowl. If using confectionery coating, repeat this process without using the shortening. If using dipping chocolate in a tub, follow the dipping directions listed on the container.
4. To make dipping the bonbons easy, and less messy, try wearing latex gloves, available in most pharmacies. Working with one bonbon at a time, quickly dip it in the melted chocolate, rolling it around to coat it completely. Rest the bonbon on a fork and let any excess chocolate drain away. Immediately roll the bonbon in the chopped peanuts or chocolate jimmies and place on the parchment-lined baking sheet to harden.
5. Alternatively, place the dipped bonbon without the jimmies or nut coating, on the parchment-lined baking sheet and top with one perfect salted peanut or a sprinkling of crushed English toffee, or when the bonbon is firm, drizzle lightly with melted white chocolate.
Recipe formatted with the Cook'n Recipe Software from DVO Enterprises.

- www.verybestbaking.com
- www.abeautifulmess.com
- www.yummily.com

Alice Osborne
Weekly Newsletter Contributer since 2006
