
How to Make Cake Balls
By Alice Osborne
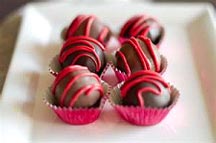 Mr. Joker (my hubby) and I had some friends for dinner last week and for dessert we drove them to the local ice-cream parlor (do people still say that?). I am not a real fan of ice-cream, weird, I know, so I walked around to see what other little treat I could get. Voila, cake balls! I'm sure you have seen them either on a stick or just spread out with various icings on top. I chose the red velvet cake bite and it was a perfect 2-3 bite dessert
So I wondered how difficult these would be to make at home and as it turns out, not difficult at all. This is the perfect little dessert for company (especially if you use different cake flavors), as well as a great treat to teach children to do for themselves.
 Pictures from: A Beautiful Mess
Step 1: Baking
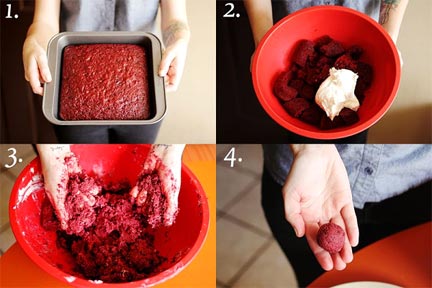
Bake your cake as you normally would in a 9x13 panAllow the cake to cool for around 15 minutes
This is the fun part: just dig into the cake and crumble it by hand. For a finer texture, you may use your food processor or hand mixer.
Step 2: Mixing
Mix in the frosting(s) of your choice into the cake crumbs
Form a paste
If you are using canned frosting, you will need about 3/4 of it or more so that the cake is not dry.
In the words of Martha Stewart your mixture is going to "feel weird." (see picture #3)
Chill the mixture in the freezer for about 30 minutes before rolling into balls. If the crumbs are too warm, the balls will crumble.
Using your hands or a melon baller, roll the crumb mixture into the size ball you would like. Recommended size is around 1 - 1.5 inches
After rolling, place in a plastic container and put in the freezer. You may stack the balls between sheets of wax paper for easer retrieval.
Freeze for at least 6 hours. You want them to be hard before dipping them into your frosting
Step 3: Frosting
 Melt your chocolate in the microwave for 1 minute at full power. Stir and microwave for 15 seconds stirring until chocolate is thoroughly melted but not boiling. You may also melt the chocolate in a double boiler
Do not over-heat. Melt at lowest temperature to have smooth frosting
Using a fork and spatula, drop the cake ball in the frosting making sure all the surfaces are coated
Lift out of frosting with your fork, allowing the extra frosting to drip off. Then gently roll your frosted cake ball onto a piece of waxed paper.
Only do a few balls at a time, keeping the rest in the freezer until ready to use. Once the balls warm up, it is sometimes harder to get them coated
You may have to gently re-heat the frosting to make it easier to work with. Once it hardens, the frosting won't stick as well to the balls.
If you are a natural cake decorator, once the frosting has set, you can decorate your balls with flowers or whatever, using your small cake tips.
You may use any frosting you would like and follow the same directions. I just love chocolate!
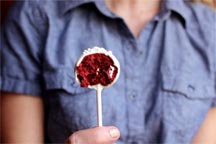
For fun, you may purchase sucker sticks at a store like WalMart, and poke them into your cake ball. (see picture above)
Step 4: Storing (Like you won't eat them all!)
You may store your finished cake balls at room temperature or in the refrigerator
If you do store them in the frig for any length of time, the balls can get "sweaty". This will not affect the taste, but they may look funny.
