
Still More Cook'n Boo Boos
We've All Made
By Alice Osborne
 For the last two newsletters I've shared information from one of my aunt Annie's favorite cooking magazines, Cooking Light, "Cooking Boo Boos We've All Made." The article listed 31, so rather than throw them at you all at once, I've been sharing them over a period of three newsletters. Here is the third and last batch of great tips:
 22. Putting all the salt in the marinade or breading. Result: Fish, poultry, or meat that's under-seasoned. Healthy cooks try to keep sodium levels in check and only allocate a small amount of salt to a recipe?so they need to maximize the salt's impact. For example, chicken marinating in citrus juice and salt will only absorb a tiny amount of the marinade. When you toss out the marinade, you also toss out most of the salt and its seasoning effect.
It's better to use a little salt in the marinade, then directly sprinkle the majority of the salt on the chicken after it comes out of the marinade. The same goes for breaded items. Sprinkle salt directly on the food and then coat it with the breading.
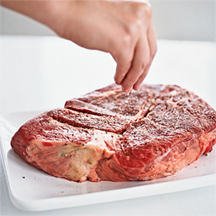
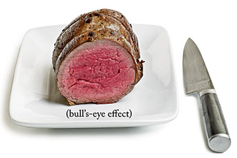 23. Popping meat straight from the fridge into the oven or onto the grill. Result: Food cooks unevenly: The outside is overdone, the inside rare or raw. Meats will cook much more evenly if you allow them to stand at room temperature for 15 to 30 minutes (depending on the size of the cut) to take the chill off.
A roast that goes into the oven refrigerator-cold will likely yield a piece of meat that is overcooked on the outside and undercooked at the center. As you slice the roast, you'll see a bull's-eye effect: The middle is rare (or even raw) while the outside is well done. This is less of a problem with smaller cuts like chicken breasts?though even those benefit from resting at room temperature for five or 10 minutes before cooking.
 24. Not knowing when to abandon ship and start over. Result: You serve a disappointing meal. And you know it's disappointing!
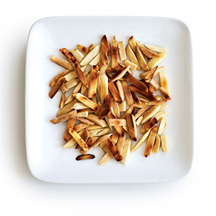
There's no shame in making a mistake; we all do. And while it may feel a bit wasteful to throw food in the trash, tossing out burned garlic, charred nuts, or smoking oil is the right thing to do. Start again fresh (if you have extras of the ingredients). Of course, there is a no-turning-back point, too. If you've overcooked a chicken because you didn't use a meat thermometer, you're bound to serve an overcooked chicken. At that point, the best practice is to 'fess up, apologize, pass the wine, and move on.
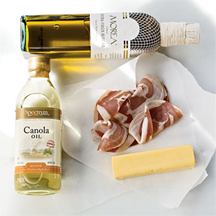 25. Using inferior ingredients. Result: Sigh. This is an important point because it's the linchpin of great cooking: Good food begins and ends with the ingredients. The dishes you cook will only be as mediocre, good, or superb as the ingredients you put in them. As a rule, we recommend using high-quality ingredients whenever available and affordable.
Always shop for the best ingredients. They're the foundation of good cooking and why we strive not to make the mistakes described here. Choose top-notch produce, meats, and cheeses, and protect them as you would anything else precious?handle with love, respect, and care so you can be a steward of the joys of great food. Your cooking will invariably turn out better.
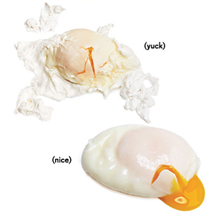 26. Poached eggs aren't pretty. Result: The typical botched poached egg is tentacled, scary, tough, overcooked.
First, fill a wide saucepan or saute pan with water to about two inches. Bring it to a gentle simmer - not a rolling boil, which toughens and twists the whites. Add a few teaspoons of vinegar, which does help eggs keep their shape. Crack eggs (fresher ones won't spread as much) into small ramekins or custard cups. The cups let you gently pour the eggs into the pan so the whites stay in a tight circle, and ensure that you won't crack a broken-yolk dud into the water. Cook three minutes (the whites should be set and the yolks still creamy), then remove carefully with a slotted spoon. Drain them for a few seconds, or blot with a paper towel. Voila: no more poor poaching.
 27. Lumpy gravy. Result: Unhappy gravy-lovers. Next time, whisk wisely. Meanwhile, here's a fix.
One cause: direct dumping of dry flour, cornstarch, or other thickener into the hot stock or broth. Another: adding broth too quickly into a roux-the flour-fat mixture that some gravy recipes start with - which can cause clumping or a gluey layer on the bottom of the pan. Hot spots in a large pan can complicate things, as well. In any starch-based sauce, the thickener needs to be gradually introduced to the hot liquid it's supposed to thicken. The easiest way: whisking a flour slurry into the broth mixture, then stirring until the gravy comes together.
If lumps happen, pass gravy through a sieve or strainer, or puree it (with an immersion blender or, very carefully, in a regular blender). If the gravy originally contained sauteed mushroom slices, well, the guests needn't know that, and it will still be delicious.
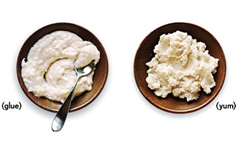 28. Gluey mashed potatoes. Result: Unhappy mashed potato-lovers. Next time, watch the cooking time and drain well. Gluey mashed potatoes are more than just unfortunate - they're usually a lost cause. Overcooked or insufficiently drained potatoes can become sticky, as can the wrong kind of potato.
The main problem is overworked spuds. It's simple science: Boiled potatoes develop swollen starch cells. When ruptured during mashing, the cells release starch. The more cells are ruptured, the gummier the mashed potatoes. So if you use an electric mixer or food processor to mash your potatoes, you'll probably beat them mercilessly and end up with wallpaper paste. Instead, use a potato masher, or pass the potatoes through a ricer or food mill before mixing them with butter and hot milk-these devices are gentler on the starch cells, and they'll also prevent lumps.
Low-starch (or waxy) red potatoes hold their shape well after boiling, so they require more effort to mash. Hence, you're likely to overwork them. Try mashing them just partway. By contrast, high-starch (mealy or floury) baking potatoes, also called russets, break down more readily, yielding light and fluffy mashed potatoes (or, with a little more milk and butter, smooth and creamy).
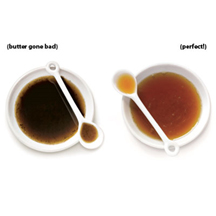 29. Burnt Brown Butter. Result: Dark and bitter butter. Next time, pay attention to the visual cues. Browning butter is a sure way to suffuse a dish with a great deal of nutty buttery flavor without using a lot of fat. But the process is a little tricky because once the butter begins to brown, it can race right into burnt. Then nutty becomes bitter.
Success depends on visual cues, so use a stainless steel pan-you can see the butter change color better. Use no more than medium heat so that the browning proceeds gradually. First the butter will foam in the pan: The milk solids are separating from the butterfat, and the water is evaporating. Then the foam subsides and the milk solids begin to brown. Now the butter gives off its characteristic nutty aroma (the French call brown butter beurre noisette, or hazelnut butter).
Some recipes call for adding lemon jice at this point; the tartness complements the sweet butter, while the juice cools it and slows the browning. Either way, when the butter turns amber-brown, take the pan off the heat. If you're not using it immediately (say, drizzling it over steamed vegetables), get it out of the hot pan and into a bowl so the residual heat doesn't continue to push the butter from brown to burnt.
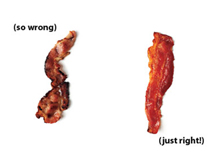 30. Burnt and crinkly bacon. Result: Burnt and crinkly bacon. Next time, bake your bacon.
Pan-frying is the standard way to cook bacon, but it has drawbacks. Only a few strips fit flat in most skillets-any more than that will slope up the sides, cooking unevenly. And bacon strips can shrink more than they need to in a hot pan. (Starting them in a cold pan helps, but you'll still need to flip often.)
Take a cue from chefs-bake your bacon. Heat hits from all sides, cooking more evenly. The result: consistently flat strips. Line a jelly-roll pan with aluminum foil or parchment paper to make cleanup easier. Set a wire rack on the pans so the bacon doesn't sit in fat. Place bacon slices in a single layer on the rack, and bake at 400 degrees for about 20 minutes (depending on bacon thickness and how crispy you like it).
Unless your oven has major hot spots, you don't have to flip the bacon or turn the pans. You can even put the bacon in while the oven preheats-the gradual temperature increase will render the fat more slowly and won't shrink the meat as much.
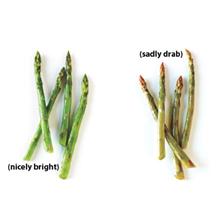 31. Green Veggies Turn Brown. Result: Drab veggies. Next time, baby them and they will stay vibrant. When vegetables take a sad turn from bright green to khaki drab, it conjures memories of grade-school cafeteria food and the ruined texture of canned asparagus. The most common culprits: overcooking and acidic dressings. A cook has to know how to care for the delicate source of the green: chlorophyll.
Vegetables such as green beans, broccoli, and asparagus lose their bright color-and crisp texture, for that matter-after six or seven minutes of cooking. If you know you'll be eating them immediately, just remove, drain, and serve. But if you'll be busy assembling other dishes, consider blanching and shocking. Cook for two minutes in salted boiling water, then remove vegetables immediately and plunge into ice water. The ice back halts the cooking process and helps set the color. Later, the chilled vegetables can be quickly reheated-by sauteing in a bit of olive oil, for instance-without losing their green.
But blanching won't keep veggies vibrant if you dress them too soon with an acid such as vinegar or lemon juice. Wait until just before serving.
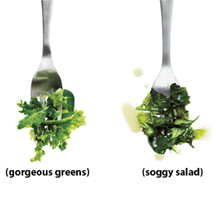 32. Salad Goes Limp. Result: Unhappy salad-lovers. Next time, consider three important factors. A soggy pile of wilted greens makes for a sorry salad indeed. Tender greens like Boston lettuce, mache, and arugula are delicate little things that perish at the mere rumor of mistreatment (tearing or roughly handling lettuce bruises it), but even crisp, hearty lettuces like romaine need to be treated with care. To keep them at their best, you need to consider three factors: time, volume, and temperature.
Only dress your greens just before serving, particularly when using vinaigrette: Oil quickly permeates the waxy surface of leafy greens, turning them dark green and droopy. If you've washed your greens, use a salad spinner or blot them delicately with paper towels to dry them. Water clinging to leaves will repel oil-based vinaigrettes and thin out creamy dressings, leading to bland salad.
Put dry greens in a salad bowl. Add less dressing than you think you'll need (to avoid overdressing), and pour it down the sides of the bowl, not onto the greens-you'll dress them more evenly this way. Gently toss, adding dressing as needed, until the greens are lightly coated. If you do overdress them, a quick whirl in the salad spinner will shake off any excess.
Finally, follow the lead of professional chefs and serve your salad on chilled plates to help keep the greens crisp as you enjoy them.

Contribute to the Cook'n Club!
DVO would love to publish your article, prose, photography and art as well as your cooking, kitchen and nutrition tips, tricks and secrets. Visit the Newsletter Submission / Win Win for All section in our Forum for more information and details.