A Strong Case for Turning to Thighs + THE Recipe for Doing So!
Today on Food 52 I found the BEST tutorial on cooking chicken. Foodie and author, Leslie Stephens, made a strong case for branching out from breasts and turning to thighs. She says there are a few actual technical reasons why skin-on, bone-in thighs get a leg up: they’re fattier (read: more flavor), their dark meat is versatile and forgiving, and they’re affordable. Lastly, once you master how to braise them, you’ve hit gold. It’s the ideal method for getting crisp skin and tender, juicy meat.
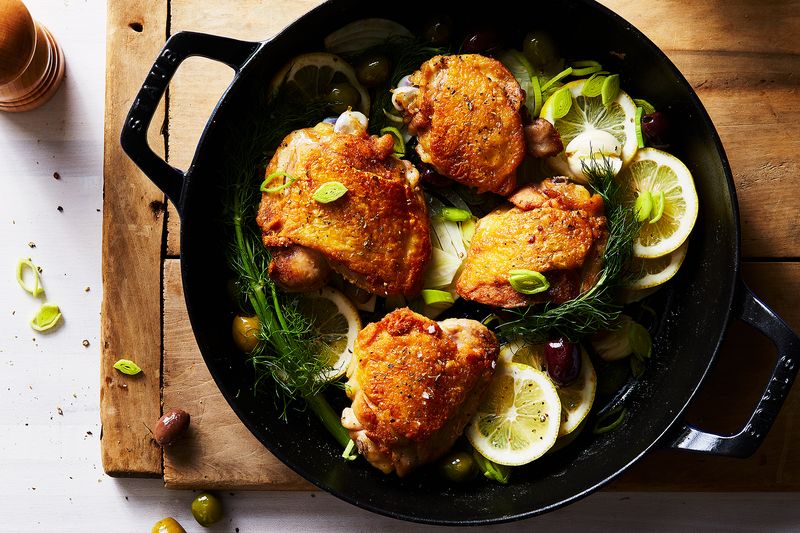
Case in point: sear some thighs in a cast-iron pan, turn them and add whole garlic cloves before removing the thighs. Then sautee onions and lemon slices for a flavor zip. Return the thighs and garlic back to the pan along with some olives and a squeeze of lemon. To finish it off, place the skillet into the oven at 350° F to finish cooking your chicken. It’s the perfect one-pan meal.
Leslie made this recipe a couple of times and found this technique is foolproof. Every single time, the skin gets crisp and browned. Every single time, the meat is juicy and cooked all the way through.

But as with all types of cooking, the fun begins when you start to experiment: You can try other aromatics (leeks, shallots), add-ins (beans, potatoes, greens, herbs, capers), and liquids (wine, stock, vinegar) to mix up the flavors, while still getting a perfectly cooked piece of chicken.
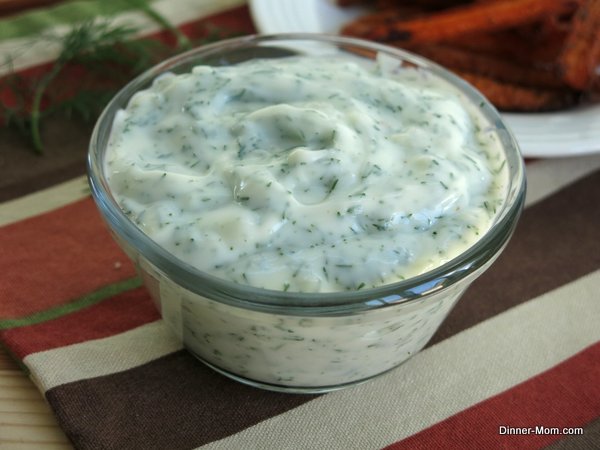
A delicious version of this dish is also Mediterranean-ish in flavor: Slide some dill sprigs under the thigh skin before searing it. Still use garlic and lemons, but substitute the onions for leeks and add in some canned chickpeas. Kale goes in 15 minutes before the dish is done baking. Then serve it all with chopped fresh dill and a dill-lemon-yogurt sauce. (Recipe below, Step 4)
But that’s just one variation. Once you have the technique down, the thigh’s the limit, as Leslie likes to say. She concludes her article with her basic braising-like-a-pro recipe:
PERFECTLY BRAISED THIGHS
1-2 tablespoons olive oil
4 skin-on, bone-in chicken thighs
Salt to taste
Freshly ground black pepper to taste
4 cloves garlic, whole and peeled
Aromatics and vegetables (onions, beans, greens, potatoes)
Liquid (lemon juice, wine, stock, brine)
Finishing sauce (optional)
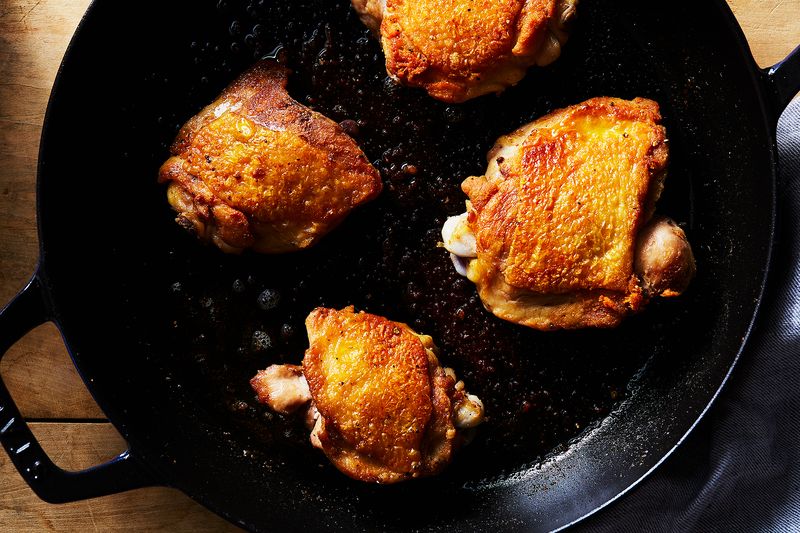
STEP 1: SEAR THE CHICKEN
Set the oven to 350° F and heat the oil in your cast-iron pan over medium-high heat. Pat the chicken dry, and stuff fresh herbs under the skin for extra flavor (a nice touch, not a requirement). Season both sides of the chicken aggressively, then plop it down in the oil, skin-side down, and DO NOT MOVE IT for about 8 minutes; let it sizzle. (Resist the urge to meddle. If you attempt to move the chicken, it’ll stick to the pan.) Turn the chicken over and toss in the garlic cloves (if using). Let them get nice and brown while the other side cooks for 3 to 4 minutes more, then remove the chicken and garlic from the pan.
STEP 2: COOK THE AROMATICS AND VEGETABLES
Here’s where you really build flavor. The basic recipe uses sliced onions and sliced lemons. Even if you forgo the onions, do stick with the lemons, because as they cook, their juices release all the browned meaty bits at the bottom of the pan. Start with your alliums, like leeks, onions, or shallots, then build from there with beans and/or vegetables of your choosing. Add briny elements, like capers and olives, towards the end of this step. If you’re going the greens route, don’t add them until about 15 minutes before the chicken is done in the oven. Otherwise, they’ll get soggy. The chicken needs about 45 minutes in the oven, but cooking time will depend on the heartiness of your vegetables (potatoes and other starchy vegetables will take longer). You want everything to be just shy of cooked all the way through so it doesn’t break down too much in the oven, so make sure you taste and test along the way.
STEP 3: FINISH THE BRAISE
Nestle the chicken and garlic back into the pan, and pour any juices that have released from the bird over the top. Dress the entire thing with a couple of tablespoons of liquid (if using lemon, the juice of one will do). Put the entire pan in the oven and bake for 45 minutes, or until the chicken is done.
STEP 4: MAKE A SAUCE
To be honest, chicken braised in this way is so flavorful that you don’t actually need a sauce. So you don't need the sauce hangin' out there in the corner, but it's a nice addition. But with the chickpea version, and with others, you can use a yogurt dipping sauce that brings everything together. A fail-safe version is essentially 1 cup of yogurt, juice from 1/2 a lemon, 2 tablespoons chopped dill, and a pinch each of salt and pepper—but any kind of yogurt-based sauce works here.

When ready to serve, spoon a thigh and some vegetables onto your plate, making sure to get some of the pan juices as well. If you’re using, sprinkle some fresh herbs over the top. When you cut into the chicken and hear the skin crackle, you know the thigh is just right. I’m betting it’ll be a long time before you go back to those chicken breasts!
- www.food52.com
- www.dinner-mom.com
 Alice Osborne
Weekly Newsletter Contributor since 2006
Email the author! alice@dvo.com