
Zeer Pots are home-made refrigerators. While having a good supply of food with great recipes to go with them is always wonderful, we wondered what would happen without refrigeration. Then, we got this article from Prepare Today Newsletter that addressed the very issue we had been asking questions about.
This nifty refrigeration requires only clay pots, sand and water. Keeping the sand moist all the time enables evaporation to cool the produce kept inside the inner pot. This enables the storage of freshly grown vegetables to last much longer than usual in a hot climate.
Here is how to make your own...
Steps
1. Obtain two large clay or terracotta pots [must be unglazed]. One pot must be smaller than the other pot. Check that the smaller pot fits inside the larger and that there is a space around it of at least one centimeter, up to three centimeters [roughly .4 inches to 1.2 inches].
2. Fill in any holes at the base of the pots. Use clay, large pebbles, cork, a homemade paste - anything suitable on hand to fill the hole. If you leave the holes open, the water will enter the inner pot and will also run out of the larger pot, making the fridge ineffective.
3. Fill the base of the larger pot with sand. Only fill to a height that will ensure the smaller pot sits even in height with the larger pot.
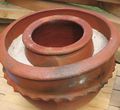
4. Place the small clay pot. Place it into the large pot on top of the lower layer of sand.
5. Fill all around the small pot with sand. Fill it right to the top.
6. Pour water into the sand. Do this until the sand is completely soaked and unable to take any more water.
7. Take a cloth or towel and dip it into water. Place it over the top of the inner pot so that it covers it completely.
8. Allow the inner pot to cool down. If you have a thermometer, you can use this, otherwise test with your hands.
9. Keep the pot-in-pot refrigerator in a dry, ventilated space for the water to evaporate effectively towards the outside.
10. Place your vegetables inside for storage. You will need to keep checking regularly for the dampness of the sand. Pour in more water as it becomes drier to keep it well moistened. Usually this will need to be done twice a day.
Tips
Try different types of vegetables and fruit to see how long they last using the pot... eggplants can last for 27 days rather than three, African spinach can be kept for 12 days instead of spoiling after one day, while tomatoes and peppers stay fresh for three weeks.
It is also possible to store sorghum and millet grains this way - the pot-in-pot refrigerator protects against humidity and stops fungi growth.
Meat can be kept for up to two weeks, as opposed to a few hours without this device.
Water and other liquids can be kept at 15ºC [59ºF].
Evaporative cooling works most effectively in dry heat and this pot-in-pot refrigerator is no different. In high humidity, you will find that this solution does not work.
Things you'll need:
 Two clay (terracotta) pots, one larger than the other
Sand
Water
Cloth to cover the pots
Clay, cork or other material to plug holes in the pots if they have them