|
How to Bake: Bread on the Grill
 One
of our readers forwarded this article to us. I had
never even considered baking bread on my grill, but it sounds
fun.Thank you Carolynn. One
of our readers forwarded this article to us. I had
never even considered baking bread on my grill, but it sounds
fun.Thank you Carolynn.
One of the slickest tricks we
know is baking bread on the grill.
Once you get to know your grill, it's easy. . . like
baking your favorite recipe in the
oven.
We can think of all kinds of reasons to use the grill.
You can enjoy fresh baked bread while camping, or at
the cabin, or at the next family reunion. Sometimes,
it's just nice to get out of the kitchen, enjoy the spring
air, and bake outside. (Watch the neighbors turn their noses
upwind when the smell of fresh baked bread wafts over the
fence.) And in the summertime, you don't have to heat up the
kitchen to bake. Finally, if there is ever an extended
emergency when the power is off, you may have the only fresh
bread in town.
You can
bake nearly anything with a covered grill. (If your
grill doesn't have a cover, improvise with a large
inverted pot.) The heat rises and circulates in the
covered area just as it does in your oven. The
heat source can be charcoal, gas, or even wood. We prefer
gas because it is easier to control and does not impart
a smoked taste to the bread. Since it is hottest near the flames,
elevate the bread even if you have to improvise.
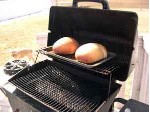
In our grill, there is a secondary shelf for baking
potatoes and such. (above picture.) For this
demonstration, we used Old-Fashioned White Bread mixes though
any mix or recipe will do. We mixed according to package
directions. After it had risen, we formed one batch into oval
country loaves, one into hamburger buns, and another into
dinner rolls. The trick to grilling bread perfectly is
controlling temperature and time. If your grill comes equipped
with a thermometer, you've got it made (though ambient
temperatures and winds may impact how well your grill retains
heat). If you have a thermometer, just heat to the temperature
designated on the package or in the recipe. If not, guess.
After a few loaves you'll have it perfect and we bet that the
first batch off the grill will be just fine.
Rolls and buns will probably bake in 15 to 20 minutes and
loaves will take 20 to 30 minutes depending on size and
temperature. An occasional peek to see how your bread is doing
as it nears completion is okay.
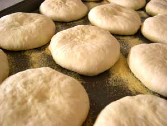
We made twelve giant-sized hamburger buns, just the ticket
for that quarter-pounder. (With our Old-Fashioned White bread
mix, the buns scaled out at 4 ounces each.) Form the buns as
you would dinner rolls then press them flat several times
until they look like those in the picture to the left. (The
dusting that you can see on the pan is cornmeal.) Cover and
let rise.
Just before baking, we washed the buns with an egg white
wash (one egg white plus one tablespoon of water). We then
sprinkled them with sesame seeds. On our grill, we baked them
with the heat turned about two-thirds open for about 18
minutes. For the dinner rolls, we used a 8 1/2 x 15-inch pan
and made 20 rolls scaled at 2.5 ounces each.
We made two country style loaves from one mix. If you look
closely you'll see that we forgot to slash the tops to release
the steam and consequently ended up with a split on the side
of the loaf. Don't do as we did-score two or three
quarter-inch deep slashes on the top of the loaf just as you
begin baking.
Here are a few more hints to help you along the way: o Bake
the bread before the burgers.
- The bread can cool while you cook
the rest of the food. Burning grease in the bottom of the
grill makes the temperature harder to control and the soot
can stain the bread.
- If you are letting your bread rise
outside where the temperature may be less than indoors or
where breezes may swirl around the bread, consider using a
large food-grade plastic bag as a greenhouse. Simply slip
the bread dough--pan and all--inside the bag, inflate it
slightly, and close it. If the day is cool, set the bag and
the bread in a sunny warm place to capture a little solar
energy.
- Grills tend to not circulate the
hot air as well as ovens. To keep the bottom of the bread
from burning, place one pan beneath the other. The second
pan will tend to insulate the bottom of the bread and keep
it from burning. Sometimes place a wire rack between the
pans for even more insulation.
- If your bread is baking faster on
one side than the other, turn the pan 180 degrees part way
through the baking cycle.
- The tendency is to burn the bottom of the bread. Place
the bread as far away from the flames as you can even if it
means elevating the bread.
We hope that you have fun baking bread outside this summer.
We do know that you will be the envy of the neighborhood,
campground, or RV park.
https://www.preparedpantry.com/grill.html
Thanks for the idea,
Desi @
DVO |