
|
6 Tips to Foolproof Homemade Cheesecake
by Alice Osborne
 One dessert that holiday menus consistently feature is cheesecake and am I glad they do! So heres a fun idea: Why not make your own? Sure, you could go to Costco theirs are pretty darn good, but why not kick it up a notch and wow your dinner guests in the process? And consider this: If there are diet concerns, you can adjust ingredients, and dont you love knowing for sure theres nothing mysterious in your food (preservatives, food colorings, and other chemical additives)? These tips will help ensure success every time you attempt making this classic dessert:
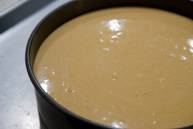
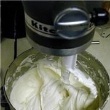 Tip 1: Mixing Properly. Tip 1: Mixing Properly. Mix the batter using a flat paddle attachment on an electric mixer; it incorporates less air than a whip beater and results in a dense, creamy texture (the goal). If you do use a whip beater, reduce the mixing speed to low or medium-low and mix for less time so the batter is creamed and not whipped.
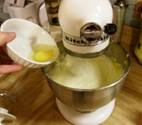 Tip 2: Ensuring a Creamy Batter. Tip 2: Ensuring a Creamy Batter. All ingredients should be at room temperature so that you can blend them well. Beat cream cheese until its absolutely smooth, with no lumps remaining, before adding other ingredients. Frequently stop the mixer and scrape down the sides of the bowl and the beaters to avoid pockets of lumpy or unmixed cheese or flour.
 Tip 3: Preventing Cracks. Tip 3: Preventing Cracks. There are as many theories as there are bakers, but prevailing wisdom attributes deep cracks to rapidly escaping steam. Deeply cavernous fissures can be caused by overbeaten egg whites collapsing during or after baking. Be careful not to overmix the batter once eggs are added. Shallow cracks around the edge of a cheesecake can occur as a cake bakes, but they often close up again once the cake has cooled. Here are ways to prevent cracks:
Add moisture by placing a pan of hot water in the oven while the cake bakes.
Bake the cheesecake in a water bath (make sure the springfrorm pan is wrapped in foil first).
Run a thin-bladed knife between the cake and pan side immediately after baking to create an escape channel for the steam (this technique cannot be used with a crumb crust).
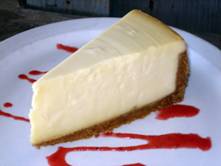
In spite of all these efforts, you may still get cracks, so consider adding a topping (duh!). Classic cheesecakes are often topped with a layer of sweetened sour cream (be still my heart). Or garnish with fresh fruit layered in colorful concentric rings. Or spread a thick layer of slightly warmed fruit preserves or jam. Or top with a can of cherry or blueberry pie filling. Or
you get the idea.
 Tip 4: Avoiding Spills. For easier and safer handling, set the batter-filled springform pan on a baking sheet when baking. This prevents the tragedy I once experienced: As I was removing a hot, just-baked cheesecake from the oven, the spring on the pan came open. The cakeand my spiritstumbled, covering the oven and the kitchen floor. Not fun. Tip 4: Avoiding Spills. For easier and safer handling, set the batter-filled springform pan on a baking sheet when baking. This prevents the tragedy I once experienced: As I was removing a hot, just-baked cheesecake from the oven, the spring on the pan came open. The cakeand my spiritstumbled, covering the oven and the kitchen floor. Not fun.
 Tip 5: Checking for Doneness. Look at the cake top. The edges should puff up slightly and turn golden or pale brown (avoid a dark brown crust). The top should look dull rather than shiny and wet. When the pan side is tapped a little, the center should move slightly but not ripple. After baking, the center will always be slightly softer than the edges, but it will firm up as it cools. The entire cake may rise slightly during baking, but it will settle and solidify as it cools. Tip 5: Checking for Doneness. Look at the cake top. The edges should puff up slightly and turn golden or pale brown (avoid a dark brown crust). The top should look dull rather than shiny and wet. When the pan side is tapped a little, the center should move slightly but not ripple. After baking, the center will always be slightly softer than the edges, but it will firm up as it cools. The entire cake may rise slightly during baking, but it will settle and solidify as it cools.
 Tip 6: Slicing Cheesecake. Dental floss works best. Take a long piece of unwaxed (and unminted, please) floss, pull it taut, and press it down across the cake, cutting it in half. Pull the floss out on one side of the cake, then rotate and press down again, making slices. If you dont have dental floss, use a knife. Heat the blade by dipping it in a glass of HOT water; wipe it off between cuts, or use a second knife to scrape the first blade clean between slicing. For the money though, I think its worth having a container of unwaxed floss in my baking supplies I use it to slice my cinnamon roll dough but thats another column. Tip 6: Slicing Cheesecake. Dental floss works best. Take a long piece of unwaxed (and unminted, please) floss, pull it taut, and press it down across the cake, cutting it in half. Pull the floss out on one side of the cake, then rotate and press down again, making slices. If you dont have dental floss, use a knife. Heat the blade by dipping it in a glass of HOT water; wipe it off between cuts, or use a second knife to scrape the first blade clean between slicing. For the money though, I think its worth having a container of unwaxed floss in my baking supplies I use it to slice my cinnamon roll dough but thats another column.
Now for the best part, my Aunt Annies award-winning, to-die-for, cheesecake recipe:
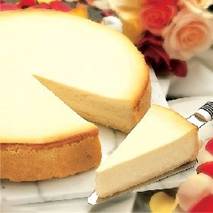
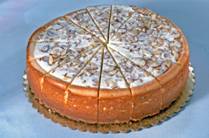
Orange Cheesecake with Toasted Pecan Crust
(Serves 16, unless Im at your table then it only serves maybe 8!)
Crust:
1 C (4 oz) pecans, toasted
3 Tbsp sugar
1 C graham cracker crumbs
Dash salt
6 Tbsp unsalted butter, melted
Filling:
4 (8 oz) pkg cream cheese, softened
1 ¼ C sugar
¼ C frozen orange juice concentrate, thawed
2 Tbsp orange-flavored liqueur, if desired
1 tsp orange extract
1 Tbsp finely grated orange peel
4 eggs
1 egg yolk
¼ C all-purpose flour
1/8 tsp salt
Topping:
2 C sour cream
¼ C sugar
1 Tbsp frozen orange juice concentrate, thawed
3 large oranges
2/3 C orange marmalade
Heat oven to 350°. In food processor, combine pecans and 3 Tbsp sugar; pulse until finely chopped. In medium bowl, combine pecan mixture, graham cracker crumbs, dash salt and butter; toss until well blended. Press crumbs evenly in bottom and ¾ of the way up the sides of a 10-inch springform pan.
In a large bowl, beat cream cheese on medium speed until smooth and creamy. Add 1 ¼ C sugar; beat until smooth. Beat in ¼ C juice concentrate, liqueur, orange extract and orange peel. Beat in eggs and egg yolk. Add flour and 1/8 tsp salt; beat just until well blended and smooth.
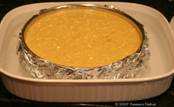
Pour into springform pan. Set on sturdy baking sheet. Add 1-2 inches of water to a 13x9 inch pan; place in oven on bottom oven rack to add moisture during baking. Place baking sheet and cheesecake in oven on center oven rack. Bake 60 min. or until edges are slightly puffed and top looks dull and is dry to the touch. Center should move slightly when side of pan is tapped, but should not ripple as if liquid.
Meanwhile, in medium bowl, combine sour cream, ¼ C sugar and 1 Tbsp juice concentrate; mix well.
Remove cheesecake from oven. Spread sour cream mixture evenly over top. Return to oven; bake an additional 10 min. Cool cheesecake on wire rack, away from drafts, 2-3 hrs or until completely cooled. Refrigerate at least 6 hrs; cover and store in refrigerator up to 3 days.* (Who are they kiddingwhen is a cheesecake ever around for 3 days?)
To serve, peel oranges with sharp knife, removing all white pith. Cut and remove wedge-shaped slices between each layer of membrane. Set slices on paper towel to drain. Arrange slices over top of cheesecake to cover.
v
In small saucepan, melt marmalade over medium heat. Brush over orange slices. Refrigerate 15 min. or until glaze is set.
*Tip: Cheesecake can be wrapped airtight and frozen up to 2 weeks. When wanting to serve, thaw overnight in refrigerator and bring to room temperature; add topping and have fun!
Per Serving (do you really want to know?): 535 cal,. 36.5 g total fat (19.5 g saturated fat), 160 mg cholesterol, 265 mg sodium, 1.5 g fiber.
 Download this recipe. Download this recipe.
(If YOU have a smart idea, won't you share it? Life is so much easier and we accomplish so much more when we pool our resources. And after all, we're all in this together. So email patty@dvo.com or alice@dvo.com with YOUR Smart Ideas!)
Contribute to the Cook'n Club!
DVO would love to publish your article, prose, photography and art as well as your cooking, kitchen and nutrition tips, tricks and secrets. Visit the Newsletter Submission / Win Win for All section in our Forum for more information and details.
|
|

