|
Part 4: Storage for Our Times
Your 72 Hour Emergency Kit
by Patty Liston
 In these Storage For Our Times articles, we have learned about the importance of at least thinking about food storage, how to store water, and preparing and storing personal documents in case of an emergency. Today, its all about 72 hour kits.
As I mentioned before, having lived in California, a 72 hour kit was a rite of passage as soon as you moved into the state. With the threat of earthquakes, (does anyone in California NOT live on a fault line?), and the assurance that we would be on our own for several days in case of an emergency, everyone invested in the security of a 72 hour kit.
The bottom-line to having the kit is thiswhat could you, your spouse, or your children, not live without for 72 hours or more? Before you read the Homeland Security guidelines, just remember that this is a process, not an event. My kits took quite a few weeks to complete, simply because I havent as yet won the lottery. Another thing, dont pack what you wont eat. I knew my one son would want beef jerky, while my other son would want gummy bears, and my husband would hate little cans of pork and beans.
Here are some suggestions to getting started.
 Involve the family! It is empowering to all ages to feel safe and prepared. Involve the family! It is empowering to all ages to feel safe and prepared.
Get a back-pack for each family member. Go to discount and thrift stores for this purchase.
Make a list of what the individual family members want in their kit.
Take everyone to the store with you to make the individual food purchases.
Have everyone try on the back-pack when it is filled. The weight can add up, so adjustments may have to be made; dad carries heavier items, little Suzi gets the candy.
Upon completion, decide where to put the packs, along with the other emergency items, where all members can grab and go.
If you can, live out of your kit for one day. This will help you all discover what is missing.
 Discuss an emergency plan: escape routes in case of fire, drills for an earthquake, your emergency contact person (see last weeks article) Put this persons name and phone number in the back-pack. Discuss an emergency plan: escape routes in case of fire, drills for an earthquake, your emergency contact person (see last weeks article) Put this persons name and phone number in the back-pack.
Decide when to rotate out the perishables and replace with new. This should be done every 6 months.
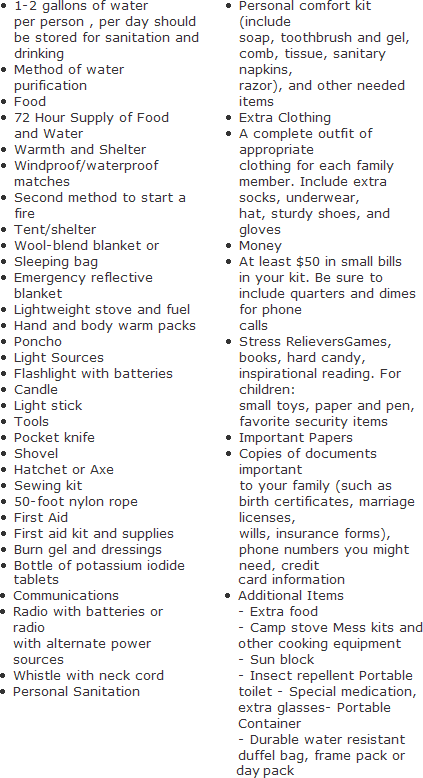
The Department of Homeland Security compiled the list below. As you will see, it is quite extensive. However, as you read the list, you will recognize the need for each item should you ever be displaced from your home, (Hurricane Katrina), or unable to live in it (earthquake, flood). You may already have many of the items listed, and can slowly add others. The good news is that none of them are perishable, so only one purchase will need to be made.
*** 72 Hour Kit Info You Need To Know ***
1) Your 72 hour kit should be in a portable container located near an exit of your house or better, sheltered in your backyard.
2) Each family member should have their own 72 hour kit with food, clothing and water. Distribute heavy items between kits.
3) Enclose the extra clothing, matches, personal documents, and other items damageable by smoke or water in plastic to protect them.
4) Keep a light source in the top of your 72 hour kit, so you can find it quickly in the dark.
5) Personalize your 72 hour kit. Make sure you fill the needs of each family member.
6) Inspect your 72 hour kit at least twice a year. Rotate food and water every six months. Dont forget to check your medications. Check childrens clothing for proper fit. Adjust clothing for winter or summer needs. Check expiration dates on batteries, light sticks, warm packs, food and water.
7) Consider the needs of elderly people as well as those with handicaps or other special needs when building your 72 hour kit. For example: for babies, store diapers, washcloth, ointment, bottles and pacifiers, and other special supplies.
8) Place small juices (6oz size) in first. Add pre-made foods like; crackers and cheese, jerky, small tuna meals, protein bars, fruit leather, and dehydrated fruits in amounts to feed one person for 3 days. Consider the likes and dietary needs of the person you are preparing for. Use Foods that are easily opened WITHOUT a can opener.
Contribute to the Cook'n Club!
DVO would love to publish your article, prose, photography and art as well as your cooking, kitchen and nutrition tips, tricks and secrets. Visit the Newsletter Submission / Win Win for All section in our Forum for more information and details.
|
|