|
|
|

|
|
Volume II
|
February 3, 2007
|
|
|

|
Carving Meat
By Amy Hunt
After the menu has been planned, the groceries bought, the table set, and the cooking done, one of the more formidable tasks involved in holiday meals and dinner parties still remains -- carving the roast. To help you carve the main attraction like a pro, follow these helpful guidelines. We've provided illustrations because it's easier to see where you should be cutting.
Basic Carving Tips
- Allow enough time before serving not only for cooking the meat, but for stand time and carving.
- A stand time of 10 to 20 minutes is recommended for large cuts of meat, such as roasts, turkeys, and whole chickens. Stand time allows the meat to finish cooking. Meat is easier to carve after standing. If meat is carved immediately out of the oven, it loses more of its flavorful juices.
- The temperatures given for removing meat and poultry from the oven are 5°F to 10°F lower than the standard final temperatures. This is because the temperature continues to rise during the stand time.
- During the stand time, put the finishing touches on the salad and side dishes. This is also a good time to make the gravy.
- Unless you are planning on carving at the table, place the meat on a large cutting board with a well at one end to hold the juice. (Or, place a cutting board inside a baking sheet. The juice will collect in the baking sheet.)
- Use a long, sharp carving knife to slice the meat and a long-handled meat fork to steady the meat.
Carving Boneless Roasts
Boneless roasts, like Pork Tenderloin, Boned & Tied Leg of Lamb, and Beef Brisket are easy to carve.
To carve boneless roasts:
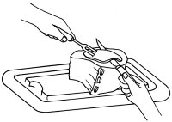
- Hold the roast steady with a long-handled meat fork.
- With the knife held perpendicular to the cutting board, cut across the grain into thin uniform slices. Cut the slices between 1/4- and 1/2-inch thick.
Slice boneless roasts across the grain
If you are carving thinner cuts of meat, like Beef Brisket, slice the meat diagonally across the grain. This will give you a slice of meat with a larger surface area.
Slice across the grain for thinner cuts of meat.
Standing Beef Rib Roast
When succulent Prime Rib is on the menu, making the right cut can really enhance the presentation and everyone's enjoyment.
To carve prime rib:
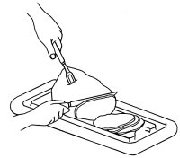
- For added stability, cut a wedge- shaped slice from the large end of the roast so that the meat will sit flat on the cutting board.
- Insert a long-handled meat fork below the top rib. Slice across the top of roast toward the rib bone. This roast can be sliced between 1/2- and 3/4-inch thick.
Slice across roast to rib bone.
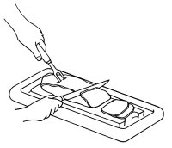
- With the tip of the knife, cut along the rib bone to release the slice of meat.

Cut along rib bone to release slice.
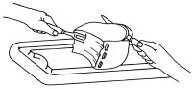
- To remove the meat slice, slide the knife blade under the cut slice of meat. Holding it steady with a meat fork, lift the slice and place it on a platter.
Slide knife under slice and then lift to plate.
Join the Cook'n Club!
An unbeatable value with exclusive benefits for members only.
Enjoy articles like this and many other benefits when you join the Cook'n Club.
|
|
|