
|
TOP SELLERS

Cook'n with Betty Crocker $29.95 
Cook'n Download $79.95

NEWSLETTERS
• NEW Cook'n Club Weekly• Current Issue • HomeCook'n Archive CONTACT US
• Contact Info 
|
|
|
||||

|
|
|||

|
|
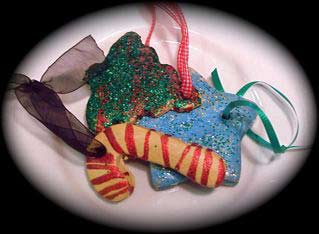
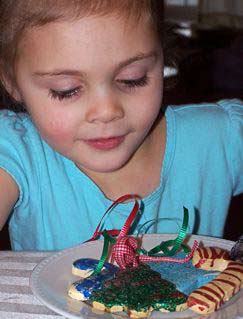
Directions: In a saucepan, combine cornstarch and baking soda. Gradually add water until the mixture is smooth. Heat, stirring constantly until the mixture reaches a moist mashed-potato consistency. Turn onto a plate, cover with a damp towel. Knead dough when cool enough to handle. Clay is now ready to shape. 2. Roll out dough on a floured surface about ¼ thick 3. Cut out desired shapes with cookie cutters 4. Use a straw to punch a hole in the top of the shape 5. Place shapes on cookie sheet and bake at 225 degrees for 2-3 hours; turning occasionally to avoid curling 6. Remove shapes from oven and cool for several hours (since these do take a while to bake and cool, we like to make the cut outs before dinner, bake them while we eat dinner, watch a classic Christmas movie while they finish baking and cooling, and then decorate before bed time. It is a great way to spend an entire evening together.)
7. Decorate!  Suggested decorating materials: Suggested decorating materials:To make a shiny, glaze-like paint, follow this recipe: |

2 tablespoons white glue
1tablespoon liquid paint or 2 drops of food color
1-2 drops liquid dish detergent
 Pour glue into ice cube tray or other small containers. Mix your choice of colored paint or food color and use immediately. Paint will dry shiny, as if glazed.
Hint: when using paint on a smooth surface, such as glass, add a drop or two of liquid dish soap to the paint mixture to help the paint adhere to the shiny surface.
8. Once glue is dry you are ready to thread ribbon through the hole and adorn your Christmas tree with beautiful homemade ornaments!
If you store your ornaments in a plastic bag in a cool dark place they will last for years.
Join the Cook'n Club!
An unbeatable value with exclusive benefits for members only.
Enjoy articles like this and many other benefits when you join the Cook'n Club.
OTHER GREAT ARTICLES
• Hand Puppet Extraordinaire
• Chocolate Eating Rules
• Straight to the Hips
• HomeCook'n Cover Page
• Hand Puppet Extraordinaire
• Chocolate Eating Rules
• Straight to the Hips
• HomeCook'n Cover Page
|
Also Available At:     |
|
Affiliate Program |
Privacy Policy |
Other Resources |
Contact Us
| Link to Us © 2007 DVO Enterprises, Inc. All rights reserved. Sales: 1-888-462-6656 Powered by WithinMySite.com |