|
Homemade Ice Cream Sandwich!
Everyone's all time favorite sandwich.
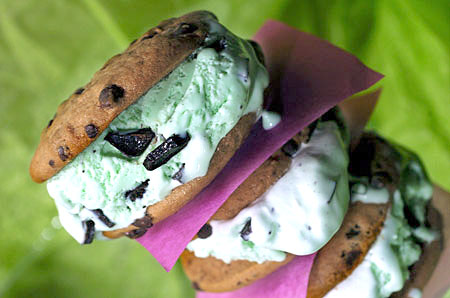
The Ice Cream Sandwich, a variation of the Earl of Sandwich's namesake, can be a two-stage affair, either eaten immediately or frozen for snacks later. The cookies are an easy mixing job, although with younger the children the less simple it is. Ice cream scooping may be a great way to get the older siblings to show their dexterity and strength, while the younger ones can place the ice cream scoops and wrap the sandwiches."These ice cream sandwiches that we made are the best," exclaimed the Krabacher kids. The Hannans echoed their sentiments: "What a great cookie recipe!!! It was tough saving enough cookies to make the ice cream sandwiches!!!"

What You Need:
- 2 1/4 cups unbleached flour
- 1 tsp baking soda
- 1 tsp salt
- 1 cup (2 sticks butter) softened
- 3/4 cup sugar
- 3/4 cup packed brown sugar
- 1 tsp vanilla extract
- 2 eggs
- 2 cups real chocolate chips
- 1 cup chopped nuts (optional)
- 1/2 cup raisins (optional)
Other Items:
- 1 large mixing bowl
- 1 large wooden spoon or paddle
- Measuring cups and spoons
- Wax paper
- Ice cream scoop
What to Do:
The children can combine the flour, baking soda and salt, blending until uniform. It is best to emphasize gentle motions because many youngsters have a tendency to let it rip when combining dry ingredients, as Big Chef Hannan found out when Little Chef Jack (4) launched "a few flour clouds."
The guiding adult should preheat the oven to 375 degrees.
In a large bowl, preferably on a low surface or on spread newspapers on the floor, 4 to 5 feet across, suggests BC Hannan, have the children beat the softened butter (an hour at room temperature or a moment in the microwave), granulated white and brown sugars, and vanilla extract until fully blended. Amy Mayfield mixes in the Cuisinart, "We go by a system: Addison (7) and Kyle (5) take turns...in order that everyone is happy. Eggs usually go to Addison but that doesn't seem to be a problem for Kyle as his past experiences have not been that great with eggs (messy, messy)."
One at a time--this may be a good place for taking turns--have a child blend in an egg until completely incorporated. The Krabacher children, although only 4 and 6, "can even crack eggs and have gotten to be good mixers." After both eggs have been beaten in, stir in the chocolate morsels, nuts, and/or raisins.
The younger children can mix the ingredients that their older brothers and sisters have measured out. As always, it may be a good idea to place newspaper on the floor and have the mixing done down there, helping to prevent high-level spills and providing a steadier base for little tikes to work on. After the mixing is complete, have the children use a tablespoon to place dollops of dough in rows about two inches apart on a greased baking sheet. Greasing is another task perfectly suited for the smaller hands and easily accomplished with a small wad of paper towel and a pat of butter or slight "pour" of vegetable oil.
The cookies take only 9-11 minutes to bake, the part of the project to be done only by the adult on board. Big Chef Hannan said that "the smell of luscious cookies filled the air." Remove the cookies from the baking pan and allow them to cool, either on a rack or in the time-honored tradition on a split brown paper bag. They must be allowed to cool thoroughly before the next step, so now might be a good time to take a break and have everyone kick in for a mid-project cleanup. Of course, this is a logical end of the first step if you prefer to break this into a two-phase affair.
The Hannans' "had a few cookies before bed and saved the rest for morning", while the Krabachers' simply let "the cookies cool while we ate dinner." The Mayfields did the cookies first and a few days later finished the project.
On to the ice-cream part: For the scooping and stuffing, have a bowl of warm water at hand, rinsing the scoop between each dip of ice cream (believe me, I worked in a Baskin-Robbins after school.) Lady Chef Hannan, from the rival Friendly's chain didn't believe about the warm water until Big Chef prevailed for at least an attempt. She is now a convert! It may be helpful to measure out the first dip and see if your helpers are able to match the size each time. Too large and the sandwich will become a terrific mess; too little and it cannot be properly called a sandwich. According to her dad, Katie Hannan (not yet 2) "was more interested in breaking some of the cookies, because she realized we were eating the mistakes."
The Mayfields based their assembly on something they'd seen elsewhere. "We had recently been to the ice cream chain 'Cold Stones', where they take ice cream and mix in whatever you want (cookies, candy, fruit, etc), so we did that with the ice cream before putting it in the cookie sandwiches. The kids got to scoop the ice cream, throw in the M & M's, and mix/pound away. Then they scooped it between the cookies which needed some assistance doing. They waited about 10-15 minutes, then raided the freezer."
Speed is important here and an assembly line, with you as the overseer pitching in where it slows down and placing the finished product quickly into the freezer, is a good idea. Or as the Krabacher children demonstrated, by "topping them and eating them right then, in about 2 seconds," the sandwiches may not make it to the freezer. Another good idea, for any freezer item, is to have masking tape (remember that stuff?) handy for dating the now nearly invisible item. Tupperware comes in handy, too, for keeping any excess air out and keeping the completed chipwiches fresher longer.
A variation: Crumble nuts or pre-frozen M&M's, and roll the outside of the chipwich, the part with the ice cream showing, in the mixture. This is something small hands are particularly adept with. For crumbling, first wrap whatever you choose in wax paper and then in a paper towel, give the kids a wooden mallet (meat tenderizer), and let them go at it. In no time they will have created the desired crumble.
|