
Truth be told, I enjoy cooking much more when I have my grandsons helping me. During the holidays I made brownies with the 13 year old, cookies with the 6 year old, (he loved pressing the cookies on the cookie sheet!), and a fairly elaborate, and need I say, candy laden gingerbread house. Even the 15 year old got involved with that one! I reason that as long as they are hungry and they are ALWAYS hungry well cook and bake. Besides teaching a valuable life-skill, I find that time spent in the kitchen is time spent making memories.
Ive included 3 recipes that children are sure to enjoy making. However, before you begin, let me share with you some ideas that I have used when cooking with my boys.
1. Make things that are simple. While braised lamb may be what you want, children are happy with simpler fare.
2. Make sure that you have all of the ingredients you will need for the recipe you choose. You know how frustrating it is to have to stop cooking to run to a neighbors or to the store; kids arent any different.
3. When measuring, make sure the child knows the difference between a teaspoon, tablespoon and what a cup of something looks like. Have them measure it out first, and then show you.
4. As ingredients are used, put them aside to eliminate confusion over what has, and has not been added to the pot/bowl/etc.
5. The kitchen will be messier than when you cook. Deal with it. Remember, you are making memories.
6. Teach children to clean up after themselves. Remember the adage: If youre old enough to make a mess, youre old enough to clean it up. Play their favorite music during clean-up time and dance your way to the sink.
7. Remember the braised lamb? If you have the future Bobby Flay or Barefoot Contessa in your home, go for it! Every good cook started somewhere.
Yogurt and Fruit Parfaits
Rachael Ray
Serves 4
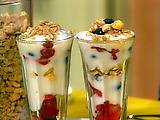
3 cups vanilla nonfat yogurt
1 cup fresh or defrosted frozen strawberries in juice
1 pint fresh blackberries, raspberries or blueberries
1 cup good quality granola
Layer 1/3 cup vanilla yogurt into the bottom each of 4 tall glasses. Combine defrosted strawberries and juice with fresh berries. Alternate layers of fruit and granola with yogurt until glasses are filled to the top. Serve parfaits immediately to keep granola crunchy.
 Download this recipe.
Fruit Kabobs
Serves 4
Download this recipe.
Fruit Kabobs
Serves 4

1 apple
1 banana
1/3 c. red seedless grapes
1/3 c. green seedless grapes
2/3 cup pineapple chunks
1 cup nonfat yogurt
¼ c. dried coconut, shredded
Utensils:
knife (you'll need help from your adult assistant)
2 wooden skewer sticks
large plate
1. Prepare the fruit by washing the grapes, washing the apples and cutting them into small squares, peeling the bananas and cutting them into chunks, and cutting the pineapple into chunks, if it's fresh. Put the fruit onto a large plate.
2. Spread coconut onto another large plate.
3. Slide pieces of fruit onto the skewer and design your own kabob by putting as much or as little of whatever fruit you want! Do this until the stick is almost covered from end to end.
4. Hold your kabob at the ends and roll it in the yogurt, so the fruit gets covered. Then roll it in the coconut.
5. Repeat these steps with another skewer.
Download this recipe.
Peanut Butter
Serves 12

1½ c. unsalted roasted peanuts
1 tbsp. peanut oil
Utensils:
food processor (the child will need help with this one)
bowl
mixing spoon
storage container
measuring cups and spoons
For smooth peanut butter:
1. Mix the peanuts with the peanut oil, and pour the mixture into the food processor.
2. Process the mixture until it's very smooth.
3. Store your smooth peanut butter in a sealed container in the fridge. It will be good for 2 weeks.
For chunky peanut butter:
1. Take about ¼ cup out of your 1½ cups of peanuts and set them aside.
2. Mix the rest of the peanuts with the oil, and pour the mixture into the food processor.
3. Process the mixture until it's very smooth, then stir in the peanuts that you had set aside.
4. Process a few seconds more to create the chunks in your chunky peanut butter.
5. Store your chunky peanut butter in a sealed container in the fridge. It will be good for 2 weeks.
Contribute to the Cook'n Club!
DVO would love to publish your article, prose, photography and art as well as your cooking, kitchen and nutrition tips, tricks and secrets. Visit the Newsletter Submission / Win Win for All section in our Forum for more information and details.