
|
SMART Ideas!
Seasoning & Caring For Cast Iron
by Alice Osborne and Patty Liston
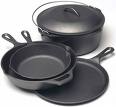 With the camping season almost upon us, and with so many campers preferring cast iron for camp cooking, we thought it would be smart to talk about how to season it so it meets its potential.
Seasoned Cast Iron is considered the "grandfather" to today's "non-stick" cookware. If it is seasoned properly and it will last a life-time. (Alices husband still uses his grandmother's cast iron skillets on a regular basis, and they must be at least 60-70+ years old.)
NEW PANS:
 1. Heat the oven to 250°-300°F
2. Coat the pan with lard or bacon grease. Don't use a liquid vegetable oil because it will leave a sticky surface and the pan will not be properly seasoned.
3. Put the pan in the oven. In 15 minutes, remove the pan & pour out any excess grease. Place the pan back in the oven and bake for 2 hours.
Repeating this process several times is recommended as it will help create a stronger "seasoning" bond.
Also, when you put the pan into service, it is recommended to use it initially for foods high in fat, such as bacon or foods cooked with fat, because the grease from these foods will help strengthen the seasoning.
PANS NEEDING RE-SEASONING:
 If the pan was not seasoned properly or a portion of the seasoning wore off and food sticks to the surface or there is rust, then it should be properly cleaned and re-seasoned.
1. Remove any food residue by cleaning the pan thoroughly with hot water and a scouring pad. I understand that heating the pan first to a temperature that is still safe to touch helps open the pores of the metal and makes it easier to clean.
2. Dry the pan immediately with dish towel or paper towel.
3. Season the pan as outlined above.
CARING FOR CAST IRON COOKWARE:
 Seasoning a cast iron pan is a natural way of creating non-stick cookware. And, like you cook and clean the modern non-stick cookware with special care to avoid scratching the surface, your cast iron cookware wants some special attention too.
Clean the cookware while it is still hot by rinsing with hot water and scraping when necessary. Do not use a scouring pad or soap (detergent) as they will break down the pan's seasoning.
Never store food in the cast iron pan as the acid in the food will breakdown the seasoning and the food will take on a metallic flavor.
Store your cast iron cookware with the lids off, especially in humid weather, because if covered, moisture can build up and cause rust. Should rust appear, the pan should be re-seasoned.
When you purchase cast iron cookware, they are medium gray in color, but after usage, they start turning darker. (Our pans are very black in color.) This is normal and should be expected. Here are a couple recipes we found on the LODGE Cast Iron website that we think youll like:
Pineapple-Coconut Upside-Down Cake
Recipe Courtesy Lodge Cast Iron Cookware
Upside-down cake is a classic cast-iron dish that, while baking, caramelizes in the skillet to create gooey, tasty topping that, when inverted, oozes down the sides, moistening every bite. This dish combines the traditional pineapple with coconut, rum, and the unique flavor of cardamom. Inspired by island cooking, these flavors are tropical in approach and mouthwatering in taste.
 For the Topping: For the Topping:
6 tablespoons unsalted butter
¾ cup packed dark brown sugar
1 can sliced pineapple
And for the Batter:
½ cup butter, softened
1 cup granulated sugar
3 large eggs
1 teaspoon vanilla extract
1 tablespoon coconut extract
1½ cups all-purpose flour
1½ teaspoons ground cardamom
2 teaspoons baking powder
¼ teaspoon salt
½ cup unsweetened pineapple juice
½ cup shredded coconut, plus ¼ cup toasted for garnish
Preheat oven to 350° F. For the Topping: Melt butter in a well seasoned 9 cast-iron skillet over medium-high heat. Add brown sugar and melt, stirring constantly, until bubbling, about 6 minutes. Remove from heat, add pineapple rings in one even layer, and set aside.
For the Batter: Beat butter in a large bowl with an electric mixer until light and fluffy. Add sugar and beat until creamy. Add eggs, one at a time, beating well after each addition.
Beat in vanilla and coconut extract. In a separate bowl, combine flour, cardamom, baking powder, and salt. Add half of the flour mixture to egg mixture and beat on low speed just until blended. Add pineapple juice and beat on low to incorporate, add remaining flour mixture, beating until just incorporated.
Spoon batter over pineapple, smoothing the top evenly. Bake on center rack of oven until golden brown and a skewer inserted in the middle comes out clean, 45 minutes to 1 hour. Remove from oven and let stand for 5 minutes. To remove from skillet, run a sharp knife around the edge to release the sides. Invert a cake plate or service platter over the skillet and invert cake onto the plate, keeping pan and plate firmly pressed together. The cake should drop from the skillet onto the plate.
Drizzle cake with any remaining liquid in pan, top with toasted coconut flakes, and serve (with sweetened whipped cream or vanilla ice cream would be our choice!).
 Download this recipe.
Whole Roasted Teriyaki-Orange Chicken
Recipe Courtesy Lodge Cast Iron Cookware Download this recipe.
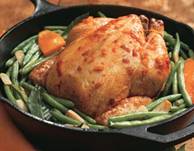
Whole Roasted Teriyaki-Orange Chicken
Recipe Courtesy Lodge Cast Iron Cookware
These days, chicken tends to be sold cut up rather that as a whole bird. Roasting the bird whole; the technique preserves the natural moisture during cooking, providing juicy and tender meat. If you can find only chicken parts, use what would compose a whole bird.
 1 (3 ½ pound) chicken
¾ cup teriyaki sauce
¼ cup fresh orange juice
¼ cup orange marmalade
2 tablespoons olive oil
6 cloves garlic, thinly sliced
2 bay leaves
2 large pieces orange rind, with pith removed and trimmed
6 scallions, green parts only, sliced into large pieces
½ pound green beans, ends snipped
Preheat oven to 375° F. Rinse chicken and pat dry with paper towels. Tuck the wings under the back and tie the legs together with kitchen twine.
In a small bowl combine teriyaki sauce, orange juice, and orange marmalade. Heat olive oil in a large Lodge cast iron skillet or Dutch oven over medium-high heat. Add garlic and sauté for 2 minutes; add onions and green beans, and cook, stirring, for 4 minutes.
Remove from heat, move vegetables to sides of skillet, add chicken, and rub thoroughly with orange-teriyaki sauce.
Add bay leaves and orange rind to the pan, place in oven, and roast until juices from under the chickens leg run clear, about 1 hour, basting every 15 minutes. After 1 hour, turn off heat and let chicken rest in oven with door cracked open for about 15 minutes.
Carve and serve with scallions and green beans.
Download this recipe.
(If YOU have a smart idea, won't you share it? Life is so much easier and we accomplish so much more when we pool our resources. And after all, we're all in this together. So email patty@dvo.com or alice@dvo.com with YOUR Smart Ideas!)
Contribute to the Cook'n Club!
DVO would love to publish your article, prose, photography and art as well as your cooking, kitchen and nutrition tips, tricks and secrets. Visit the Newsletter Submission / Win Win for All section in our Forum for more information and details.
|
|

