Defrosting a freezer is certainly not a favorite on anyones to-do list, but it is a necessary TO DO to keep a freezer running efficiently. Frost buildup increases the energy needed to keep the motor running, so defrosting your freezer is an important step in being money-savvy, AND youll never have to wonder whats at the bottom of your freezer again.
The best time to defrost is when stocks of food are at their lowest, for example, after the holidays or in early summer, before you stock it with garden produce. The less food to move, the easier the job, so pick times when your stock is depleted (before grocery day might be another good time).
Notice how thick the ice is on the freezer walls. It should be a quarter inch before needing defrosting. Defrosting more or less often wastes energy, but typical families need to defrost their freezers once or twice a year.
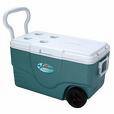
Youll need a large cooler nearby to hold good food that will go back into the freezer when defrosting is finished. If you dont have a cooler, wrap the food in newspaper and put it into a large box, covered with a blanket. If the food is stacked tightly and insulated well, it will stay colder longer.

Start the process by removing all food. Work smarter, not harder: keep a trash can and the cooler next to the freezer. Toss food that shows signs of freezer burn or isnt well-packaged. Food that looks good and has not expired can go into the cooler to be kept cold as you work. When the freezer is empty, unplug it. If its an upright model, place towels inside the bottom of the unit to catch any drips (drip pans or baking sheets work well also.)
The longest tactic to removing frost is allowing it to melt naturally, but this requires the least amount of hands-on time for you. This process can take several hours, but you can accomplish other tasks around the house in the meantime. If you want to do the job quickly though, place a big pot of boiling water atop a pot holder inside the freezer. The hot water will hastens the melting.
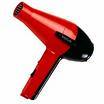
Another tactic is the blow dyer method, letting the warm air do the work for you. Whatever method you use, just be sure you dont forcibly pry the ice offthe freezer lining is easy to puncture, which ruins a freezer.
When fully defrosted, use a wet-dry vacuum cleaner to remove any leftover ice debris and water. Once this is accomplished, clean the freezer interior:
In a cleaning bucket, add two tablespoons baking soda to one quart hottish water. Use a soft cloth and this solution to gently wipe down the freezer interior. Next, rewipe surfaces with clean warm water. Finish by thoroughly wiping with a dry towel, then plug in the freezer. Allow the appliance to run for one hour before replacing the contents.
If you tossed any food, you may find the freezer is roomier than before. While this might seem like a good thing, a freezer actually runs more efficiently if its chock full. There are a few options for getting it to this state: Either purchase more food to freeze, or fill the large spaces with loaves of bread (an inexpensive filler), or add crumpled newsprint (an even less expensive filler). The goal is to prevent air circulation which will keep the freezer running as efficiently as possible.
To keep your freezer clean and well-maintained, package food properly before freezing. Store it in air-tight containers, specifically designed for the freezer and be sure to remove any trapped air from freezer bags. (Trapped air affects food flavor and texture.)

To absorb any lurking odors and keep your freezer smelling fresh, add an open box of baking soda. Marking the box with a reminder date will help you to know when to replace it (every three months is best).
Finally, to keep your freezer running as efficiently as possible, make sure the door seal is in good shape and working correctly. The easiest way to check your seal is to close the door on a piece of paper. If the paper can be pulled out easily, the seal is worn and needs replacing.
Also, consider keep this handy freezing reference guide taped to your freezer. Follow these guidelines to avoid waste and your freezer can be a great asset to your food budget!
Freezing Guidelines:
Baked Quick Breads: 2-3 months
Bread: 3 months
Flour: 1-2 years
Butter: 9 months
Margarine: 12 months
Hard natural cheeses: 6 months
Processed Cheese: 6 months
Pork Chops: 4-6 months
Beef: 6-9 months
Fish: 6 months
Chicken: 6-9 months
Bacon: 1 month
Egg Substitute: 1 year
(If YOU have a smart idea, won't you share it? Life is so much easier and we accomplish so much more when we pool our resources. And after all, we're all in this together. So email
patty@dvo.com or
alice@dvo.com with YOUR Smart Ideas!)
Contribute to the Cook'n Club!
DVO would love to publish your article, prose, photography and art as well as your cooking, kitchen and nutrition tips, tricks and secrets. Visit the Newsletter Submission / Win Win for All section in our Forum for more information and details.