Ive discovered what the Etruscans knew over twenty centuries agothe incredible taste and joy of cooking in a clay cooking pot. These folks were master-workers in terra-cottaporous, unglazed, fired clay. Terra-cotta statues graced their magnificent temples, and terra-cotta cookware stood in the kitchens of their splendid villas. The Romans eventually destroyed the Etruscan civilization, but not before they had adopted their clay cooking pots.
Heres why this process was so worth preserving and what to know about it: First, dont confuse wet-clay cookers with glazed earthenware cooking pots. Once a pot is glazed it is no longer porous; that is, it cannot absorb water. The pots I am talking about are purposely left unglazed so that they can soak up a considerable amount of water. The principle of wet clay cooking is this: porous clay allows some vapors to escape, so that a great deal of liquid does not accumulate in the cooker. As the wet clay dries, evaporating water bathes the food in a light cloud of steam so that it does not stick to the pot. Food cooks with a minimum of liquid and no additional fat. All nutrients remain in the pot, a boon to both dieters and the health-conscious!
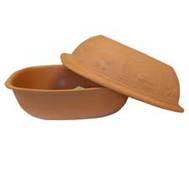
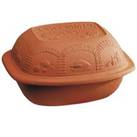
The best-known modern versions of the unglazed clay pot are imported from Germanythe Romertopf (literally, Roman Pot) and Schlemmertopf (roughly, feast pot). Both body and lid of the Romertopf are completely unglazed, inside and out, with a ridged bottom to elevate a roast or chicken slightly so that it is bathed in savory vapor and browns on all sides. The Schlemmertopf lid is unglazed, but the pot has a slick of glazing inside the bottom to facilitate cleaning. Both brands come in five sizes, from a small pot thats just right for dinner for two, to one big enough to hold the Thanksgiving turkey.
Unlike other cooking vessels, clay pots must be soaked before use for at least fifteen minutes (any questions you have can be answered by the instructions that come with the pot).The dish is then filled with food, covered, and placed in a cold oven; clay cookers are sturdy, but abrupt temperature changes may cause them to crack. Turn the heat to the desired temperature, and begin to count cooking time when the oven has reached the prescribed heat level.
If you want to add liquid to a heated pot, warm it first. Never use the pot over a burner or heating elementthese are ONLY for baking with. Never allow the pot to touch the sides of the oven, and when you remove it from the oven, place it on a folded towel, a cork trivet or a wooden board. Just observe these few precautions, and your pot should serve you well for years.
Once the pot is in the oven, you can more or less forget it until you check for doneness. The food is self-basting; its almost impossible to burn it. Whats more, you can take the pot from the oven and leave it, covered, for up to half an hourthe food will still be warm. Plus, the cookers are pretty enough to go to the table. AND, the oven stays clean!
Before you use a clay cooker for the first time, immerse the two halves of the pot in water and soak them for half an hour. Then give them a brisk scrub with a stiff brush to remove any traces of brick dust. After that, soak both parts of the cooker for about fifteen minutes before every use.
 For cooking time
, remember the rule of thumb for clay-cooking: Add 100 degrees to the heat and a half hour to the cooking time specified in most conventional recipes.
For cleaning and care, once the pot is cool, soak it in warm water with a drop of dishwashing liquid. Sprinkle it with salt and scrub it with a stiff brush or non-metallic abrasive pad. DONT scour with metal or powdered cleansers; these will clog the pores and render the pot useless. When the pot needs an extra thorough cleaning, soak it in hot water with three tablespoons of baking soda. Clay pots should never go in the dishwasher. Store clean pots uncovered, or with the lids upside down inside them, but never tightly sealed. This gives the pots a chance to dry thoroughly between uses, and eliminates risk of mold.
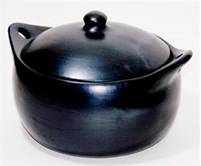
Finally, dont expect your clay pot to retain its virginal, untouched look that it had when you first brought it home. With use, the pot seasons slowly. First, it becomes mottled, then the spots darken and eventually even out as the pot takes on the patina of any well-loved piece of equipment. This is one of the joys of owning an unglazed potit acquires its own character and identity. It simply becomes more beautiful with age.
Now for a couple recipes to get us started:
Hearty Soup for a Cold Day
Serves 6-8
6 Tbsp bulgur wheat (cracked wheat)
1 lb lean ground beef
1 egg
2 Tbsp soy sauce
1/8 tap freshly ground pepper
2 Tbsp flour
8 C beef stock or bouillon (at room temperature)
1 can (2 C) tomatoes
1 onion, finely chopped
1 stalk celery, finely chopped
½ clove garlic, minced
1½ tsp salt
½ tsp dried thyme
½ tsp dried basil
1 tsp chopped fresh parsley
2 tsp Worcestershire sauce
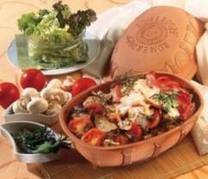
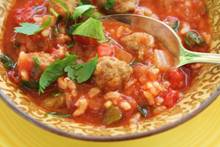
Soak a 4-quart clay pot in water for 15 min. Combine t Tbsp bulgur wheat with ground meat, egg, soy sauce and pepper. With a light touch, form the mixture into 48 to 60 small balls. Put the meat balls in the clay pot and sprinkle them with flour. Combine the beef bouillon and tomatoes with the onion, celery, garlic, salt, herbs, Worcestershire sauce and the remaining 4 Tbsp of bulgur wheat, and pour over the meat balls. Cover the pot and put it in a cold oven. Set the temperature at 425 degrees and bake for 1 hour. Uncover and taste for seasoning. Skim off any fat.
(NOTE: When removing the pot lid, tilt the lid so that steam escapes away from you and doesnt hit you in the face.)
 Download this recipe.
Baked Chicken with Thyme
Serves 4
Download this recipe.
Baked Chicken with Thyme
Serves 4
1 chicken (3-3½ lbs)
Salt
Pepper
1 generous handful fresh thyme (in branches)
8 Tbsp (1 stick) butter
1 C dry white wine
¼ C heavy cream
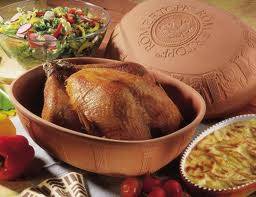
Soak a 2- to 3-quart clay cooker (one just large enough to hold the chicken) in enough water to cover it for ½ hr. Preheat oven to 450 degrees. Rub the chicken inside and out with salt and pepper. Insert the thyme and the stick of butter into the chickens cavity. Sew or truss up the opening and legs. Drain the casserole and add the chicken.
Pour the white wine over it; cover and put the chicken in the oven. Cook chicken for 1 hr, or until the juices from the thickest part of the thigh run clear when the thigh is pierced. If you insist on a deeply browned chicken, you should peek at your bird after 45 minutes and finish it uncovered (if you arent satisfied with the color to that point). When chicken is done, remove it to a serving platter. Remove as much fat from cooking liquid as you can and strain it into a saucepan. Over low heat, whisk in the heavy cream. Serve this as a side sauce with the chicken.
Download this recipe.
(If YOU have a smart idea, won't you share it? Life is so much easier and we accomplish so much more when we pool our resources. And after all, we're all in this together. So email
patty@dvo.com or
alice@dvo.com with YOUR The Glorious Asparagus Spear!)
Contribute to the Cook'n Club!
DVO would love to publish your article, prose, photography and art as well as your cooking, kitchen and nutrition tips, tricks and secrets. Visit the Newsletter Submission / Win Win for All section in our Forum for more information and details.