
|
 |
|
|||||

|
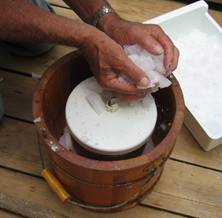
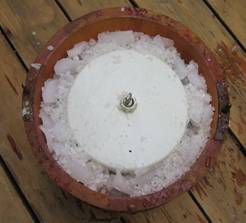
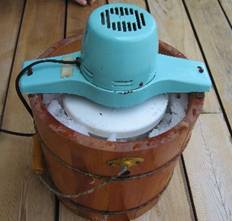
Churning- Good ice cream is determined not only by the taste but also the texture. The continuous churning with the ice cream freezer is important because it adds air into the mixture. this makes the ice cream smooth and increases its final volume. Once you start the churning process, don't stop! If you did stop for a long break, large ice crystals would form in the coldest part of the mixture. this would produce a grainy texture in parts of the ice cream and the center may not even freeze. The continuous churning also distributes the flavorings and brings the un-frozen portions of the mixture to the surface. The ice cream mixture usually takes between 20 to 30 minutes to freeze and the freezing container is then placed into a freezer to allow the ice cream to harden. Now while it isnt July yet, dont you think its a smart idea to start practicing, so were properly ready for National Ice Cream month? And what better way to practice than by incorporating this Springs yum yum crop of fresh strawberries? Here goes! Old-Fashioned Strawberry Ice Cream 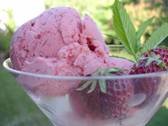 6 Tbsp flour 6 Tbsp flour3 C sugar, divided 1 tsp salt 4 C cream or milk 6 eggs 2 pints fresh strawberries 2 Tbsp fresh lemon juice 4 C cream or half & half cream 2 Tbsp pure vanilla extract Dash red food coloring (optional) Crushed Ice Rock Salt (Whole milk, half & half cream, and/or low-fat condensed milk may be used to lower the calories; these substitutions may effect how creamy your ice cream will turn out.)  In a heavy 3-quart saucepan, combine flour, 2 cups sugar, and salt until well blended (I wire whisk works great). Blend in cream or milk and eggs until well blended. Over medium-low heat, cook, stirring constantly, until the mixture (custard) thickens and will coat the back of a metal spoon with a thin film, approximately 30 minutes. NOTE: Do not let the mixture boil or it will curdle. If, of course by accident, your custard base does curdle, immediately remove from heat and place in a blender; process until smooth. In a heavy 3-quart saucepan, combine flour, 2 cups sugar, and salt until well blended (I wire whisk works great). Blend in cream or milk and eggs until well blended. Over medium-low heat, cook, stirring constantly, until the mixture (custard) thickens and will coat the back of a metal spoon with a thin film, approximately 30 minutes. NOTE: Do not let the mixture boil or it will curdle. If, of course by accident, your custard base does curdle, immediately remove from heat and place in a blender; process until smooth.
Remove from heat and let custard cool. Cover and refrigerate until thoroughly chilled, at least 2 hours but ideally for 24 hours. NOTE: Cool quickly by setting pan in ice or cold water and stirring for a few minutes. This aging process will give the mixture better whipping qualities and produce ice cream with more body and a smoother texture.  In a large bowl using a potato masher, crush strawberries with lemon juice and the remaining 1 cup sugar. Let stand for 1 hour. In a large bowl using a potato masher, crush strawberries with lemon juice and the remaining 1 cup sugar. Let stand for 1 hour.
After custard mixture has aged and is well chilled, remove from refrigerator and add and stir together cream or half & half, vanilla extract, food coloring (optional), and strawberry mixture. The ice cream mixture is now ready for the freezing process. Transfer the mixture into your ice cream maker can and freeze according to the manufacturer's instructions. DVO would love to publish your article, prose, photography and art as well as your cooking, kitchen and nutrition tips, tricks and secrets. Visit the Newsletter Submission / Win Win for All section in our Forum for more information and details.
OTHER GREAT ARTICLES
Pancakes to the Rescue! Homemade Yogurt Frozen Burritos for Picky Eaters! Special Delivery Cook'n Club Cover Page |
 "ICE CREAM, You Scream, We All..."
 National Ice Cream Month is celebrated by the US every July. This month was designated as national ice cream month by Ronald Reagan in 1984. He also appointed the third Sunday in July as National Ice Cream Day. Reagan recognized the popularity of ice cream in the United States (90% of the nation's population consumes ice cream) and stated that these two events should be observed with "appropriate ceremonies and activities."
 The International Ice Cream Association (IICA) also encourages all retailers and consumers to celebrate July as National Ice Cream Month and National Ice Cream Day. This is because the ice cream industry provides thousands of jobs for its United States citizens and generates annually in sales approximately 20 billion dollars.
|
Terms & Conditions | Webmaster | Privacy Policy | Unsubscribe © 2007 DVO Enterprises, Inc. All rights reserved. Sales: 1-888-462-6656 |